Tutorial – How to build a 3D hiking app
In this tutorial, you'll create an app displaying hiking trails in 3D.
More specifically, you'll:
- Get data from the Geneva Territory Information System (SITG).
- Explore metadata and access web services.
- Create a web scene with ArcGIS Scene Viewer (including setting up a local scene, choosing a basemap, adding layers, capturing slides and clipping to an extent).
- Build a 3D Viewer App (including using the web scene you created earlier and configuring the app's details, interactivity, and look and feel).
- Publish your 3D hiking app.
- Make a short URL to customise your app even further.
🤔 But why would I want to create a hiking app in 3D?
I'm glad you ask. Well, for multiple reasons:
- Promote local trails in your region.
- Showcase trails curated by you.
- Take a virtual hike when you cannot join the hiking party.
- Assess a trail before doing it in real life.
- Share your hiking adventure with your friends.
Let's get started!
1 Choose the tool
Choose → Prepare → Create → Share
This tutorial will use two applications that produce 3D visualisations: 3D Scene Viewer and Instant Apps - 3D Viewer template.
You can access both apps for free in ArcGIS Online; check out the post below for more information on the available options.
 Cristina
Once you create your account (if you haven't got one yet), you're ready to proceed.
2 Prepare the data
Choose → Prepare → Create → Share
2.1 Get data from the Geneva Territory Information System (SITG)
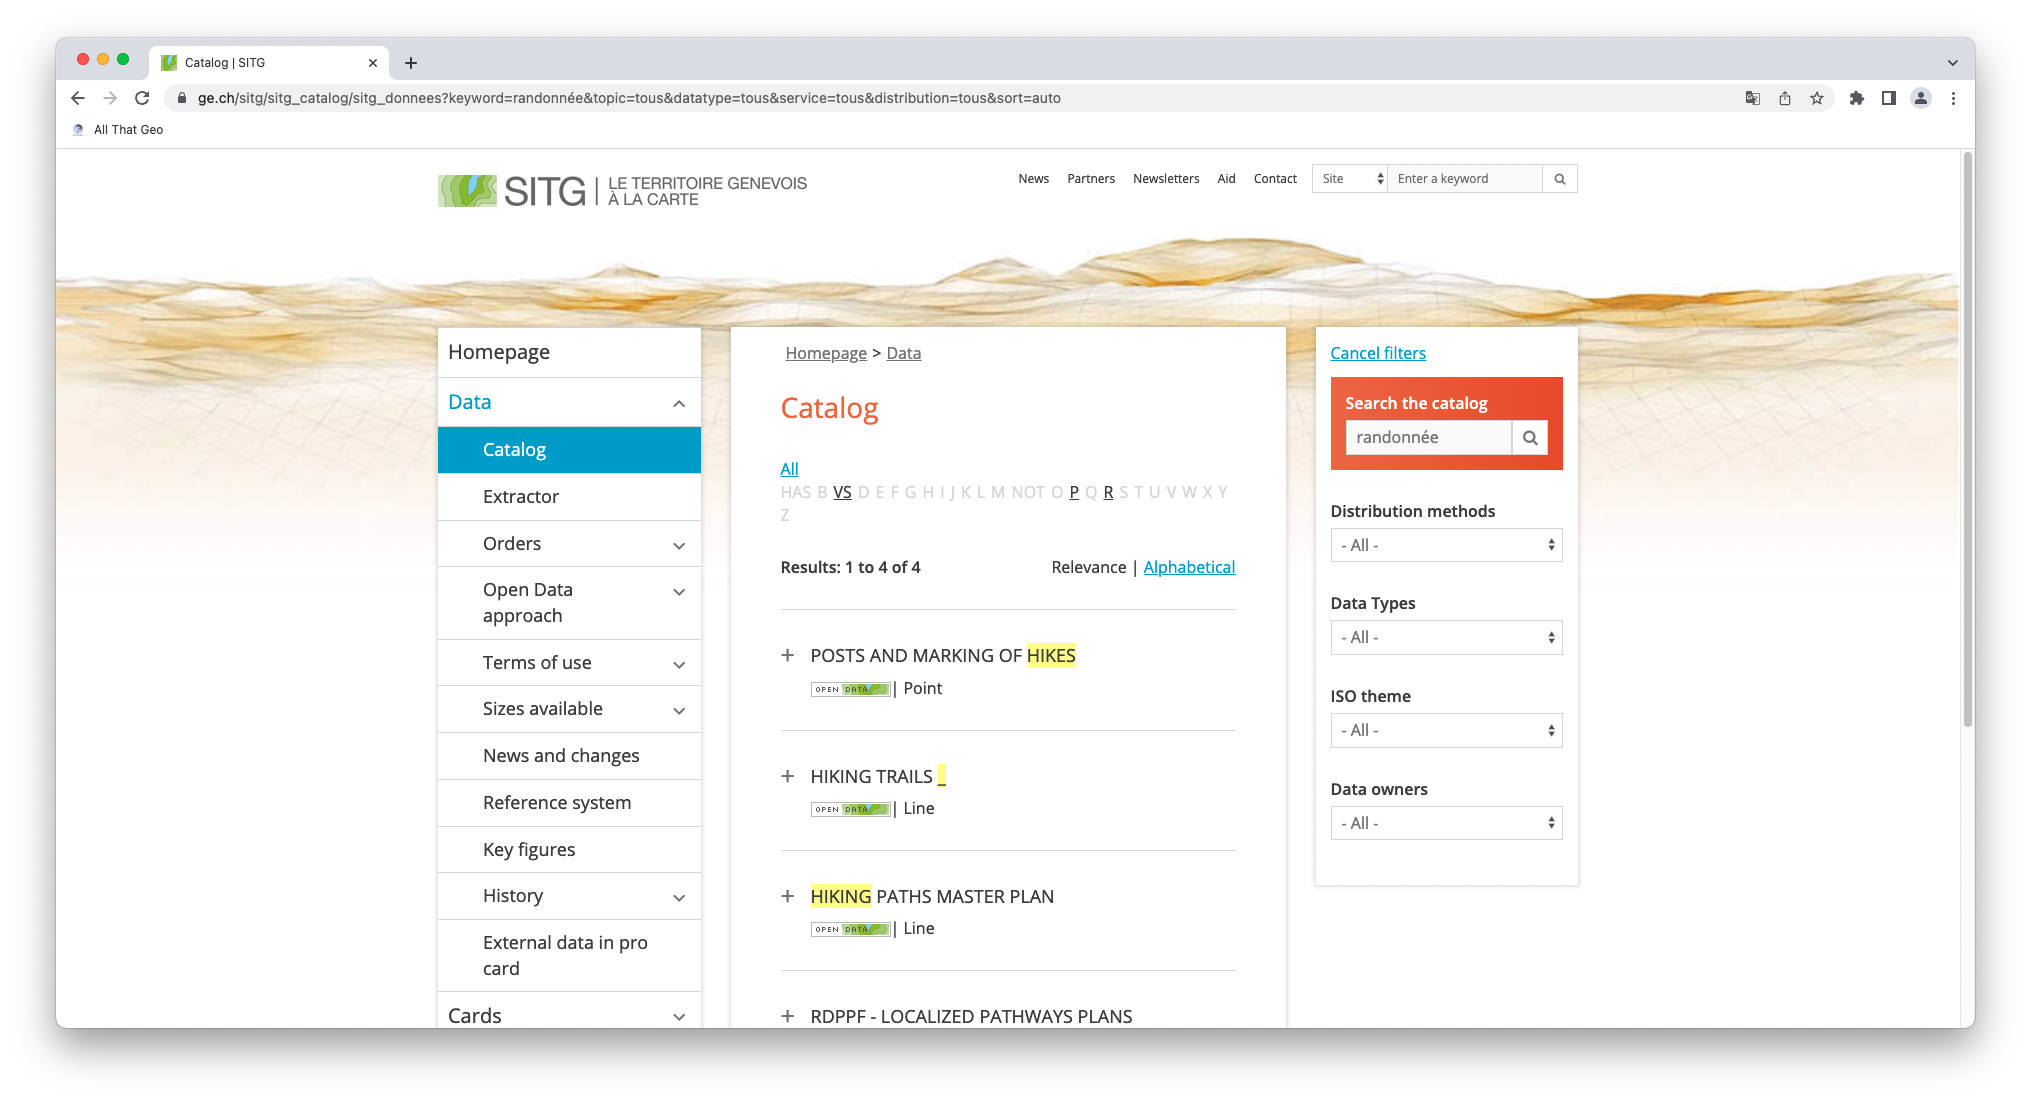
The app you're about to create will display hiking trails in Geneva, Switzerland. To find the appropriate data, we will explore the Système d'Information du Territoire à Genève (SITG)'s data catalogue.
Because the website is in French, we used the search word 'randonnée' (French for hiking).
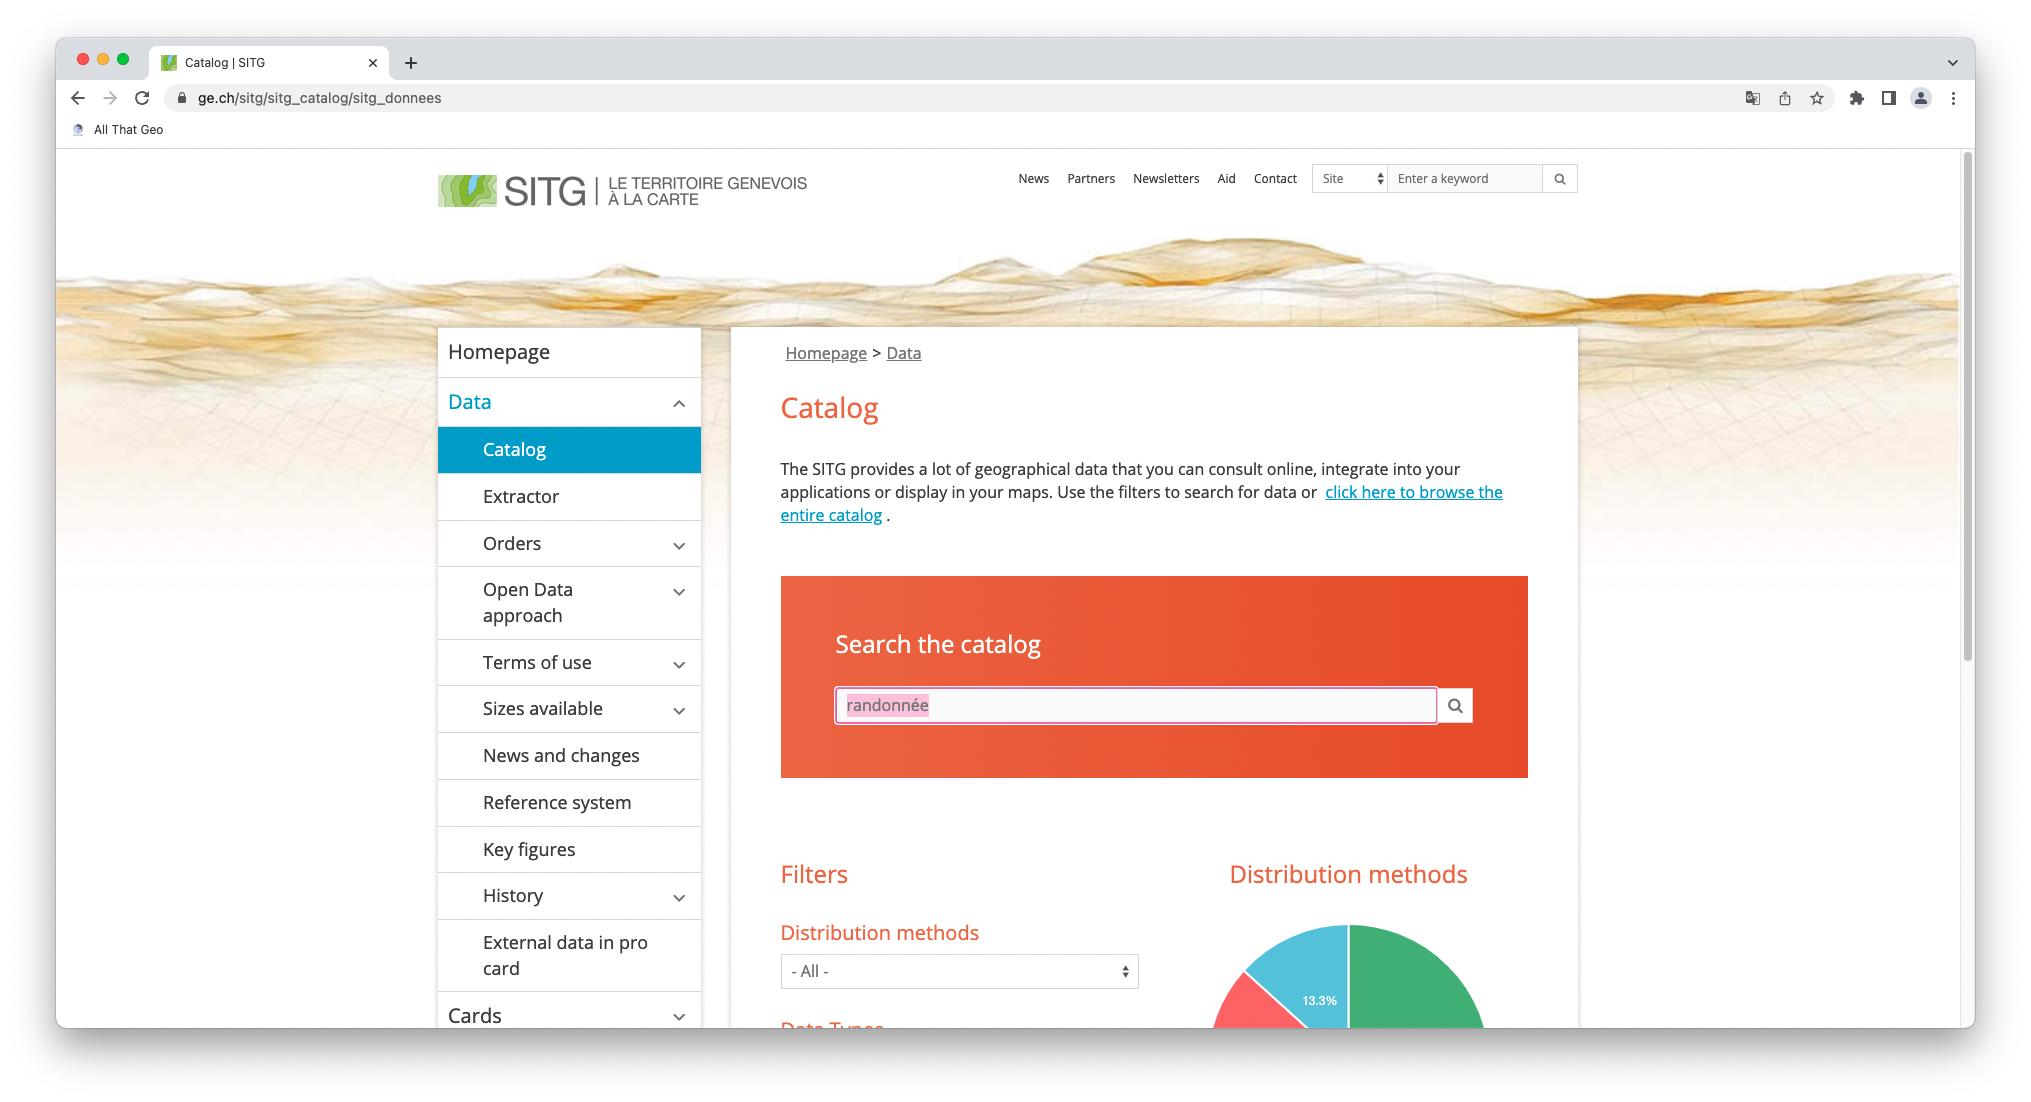
From the results list, find the following two datasets:
- POSTS AND MARKING OF HIKES
- HIKING TRAILS
2.2 Explore the metadata and access the web services
Let's start with the POSTS AND MARKING OF HIKES dataset. Click on See the complete file to access the dataset's metadata.
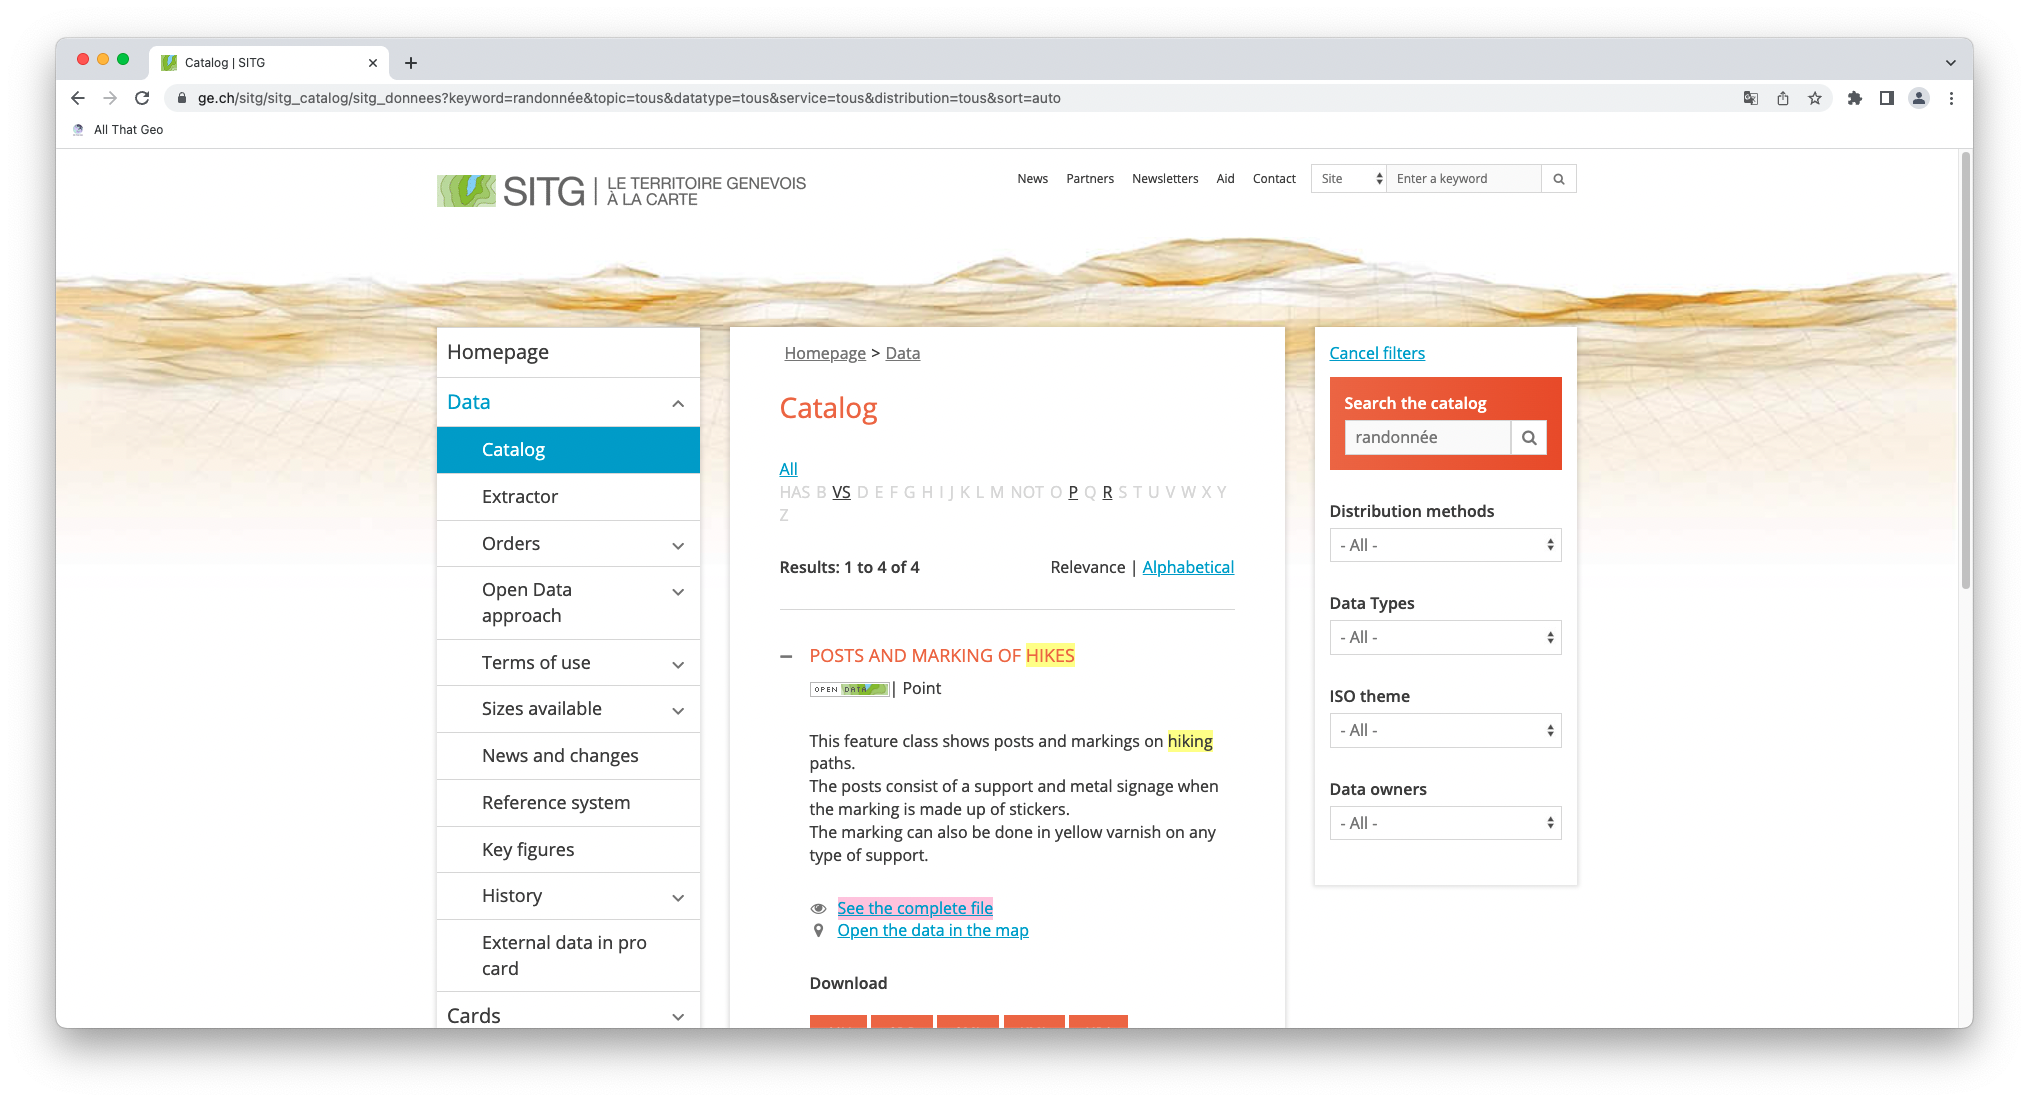
Here, you'll find helpful information such as Data type, Description, Date updated, and the list of Attributes.
In addition, you'll find the list of ONLINE SERVICES available for you to use.
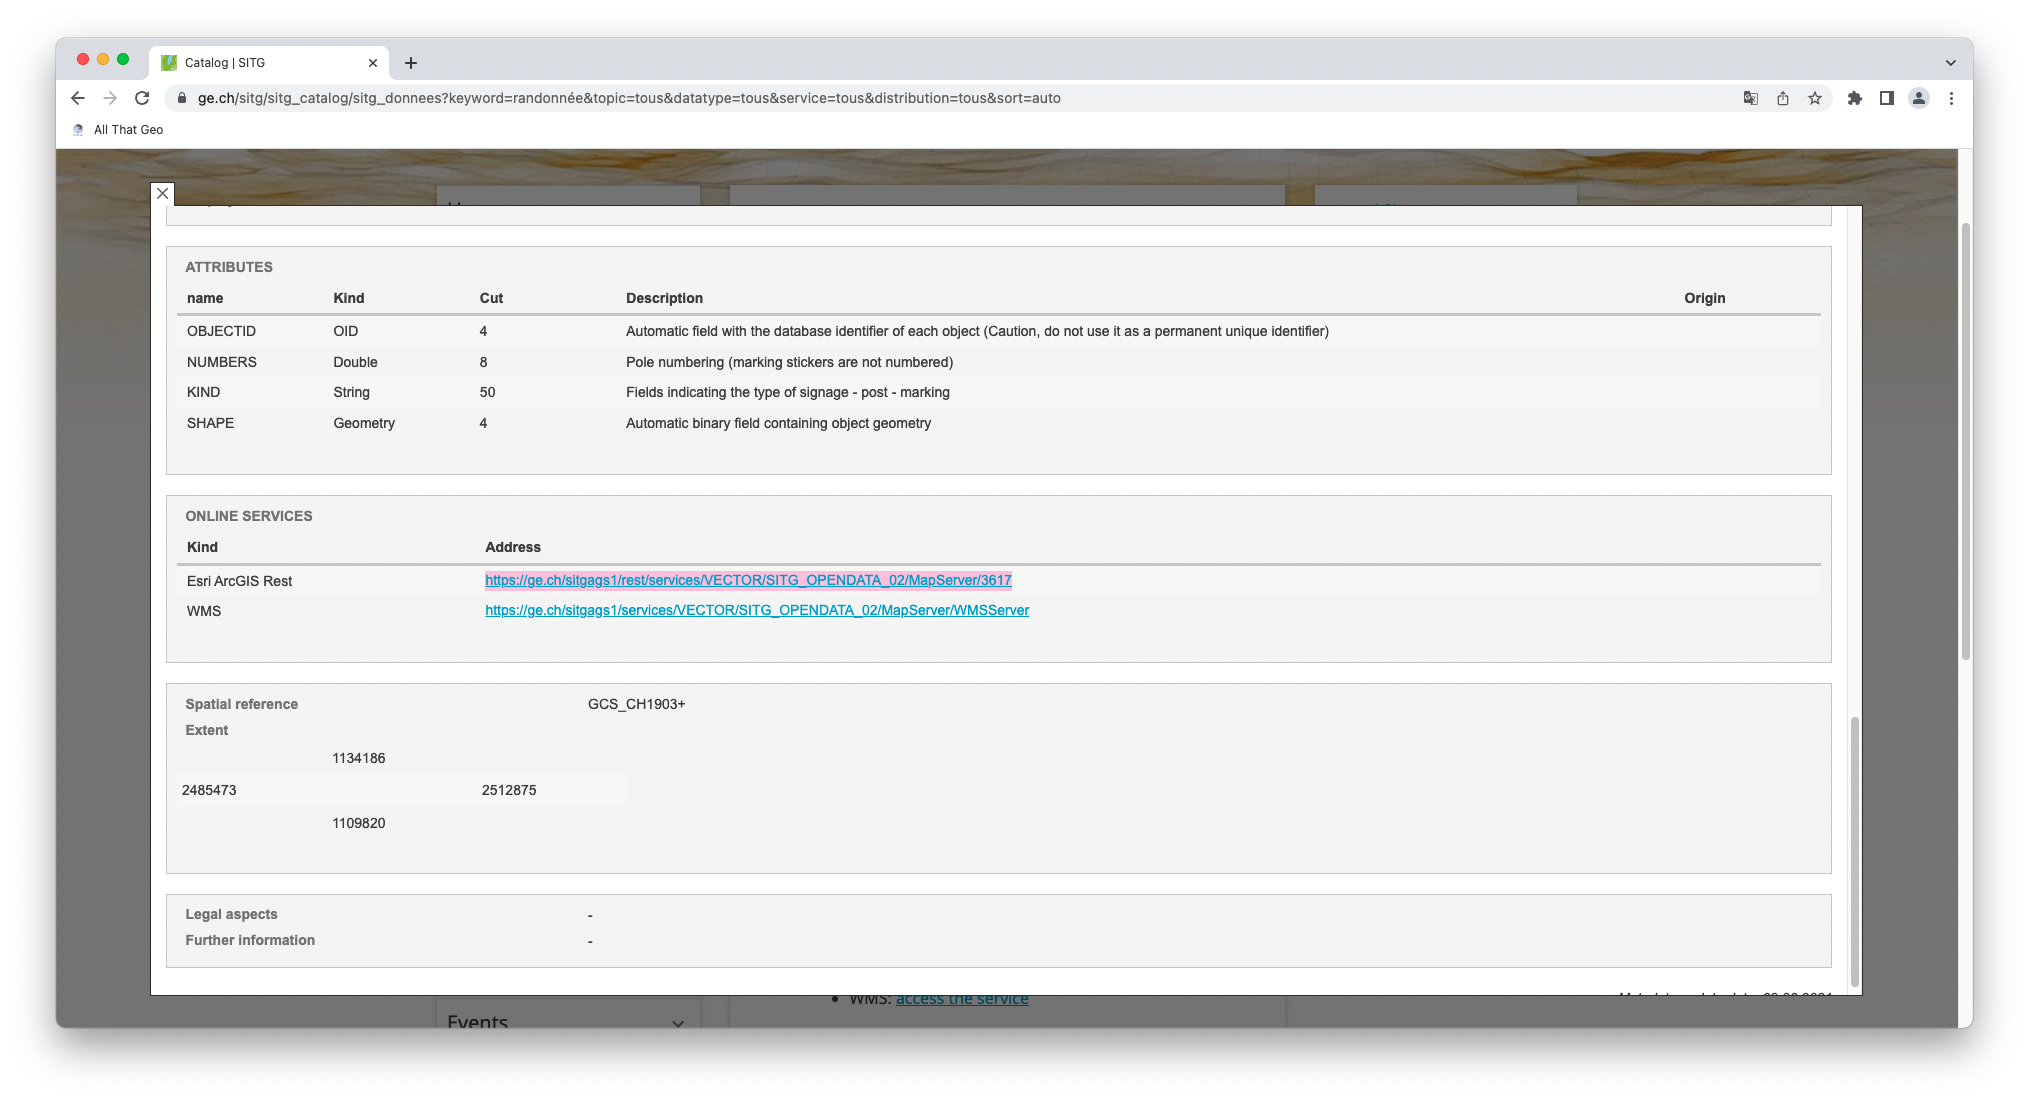
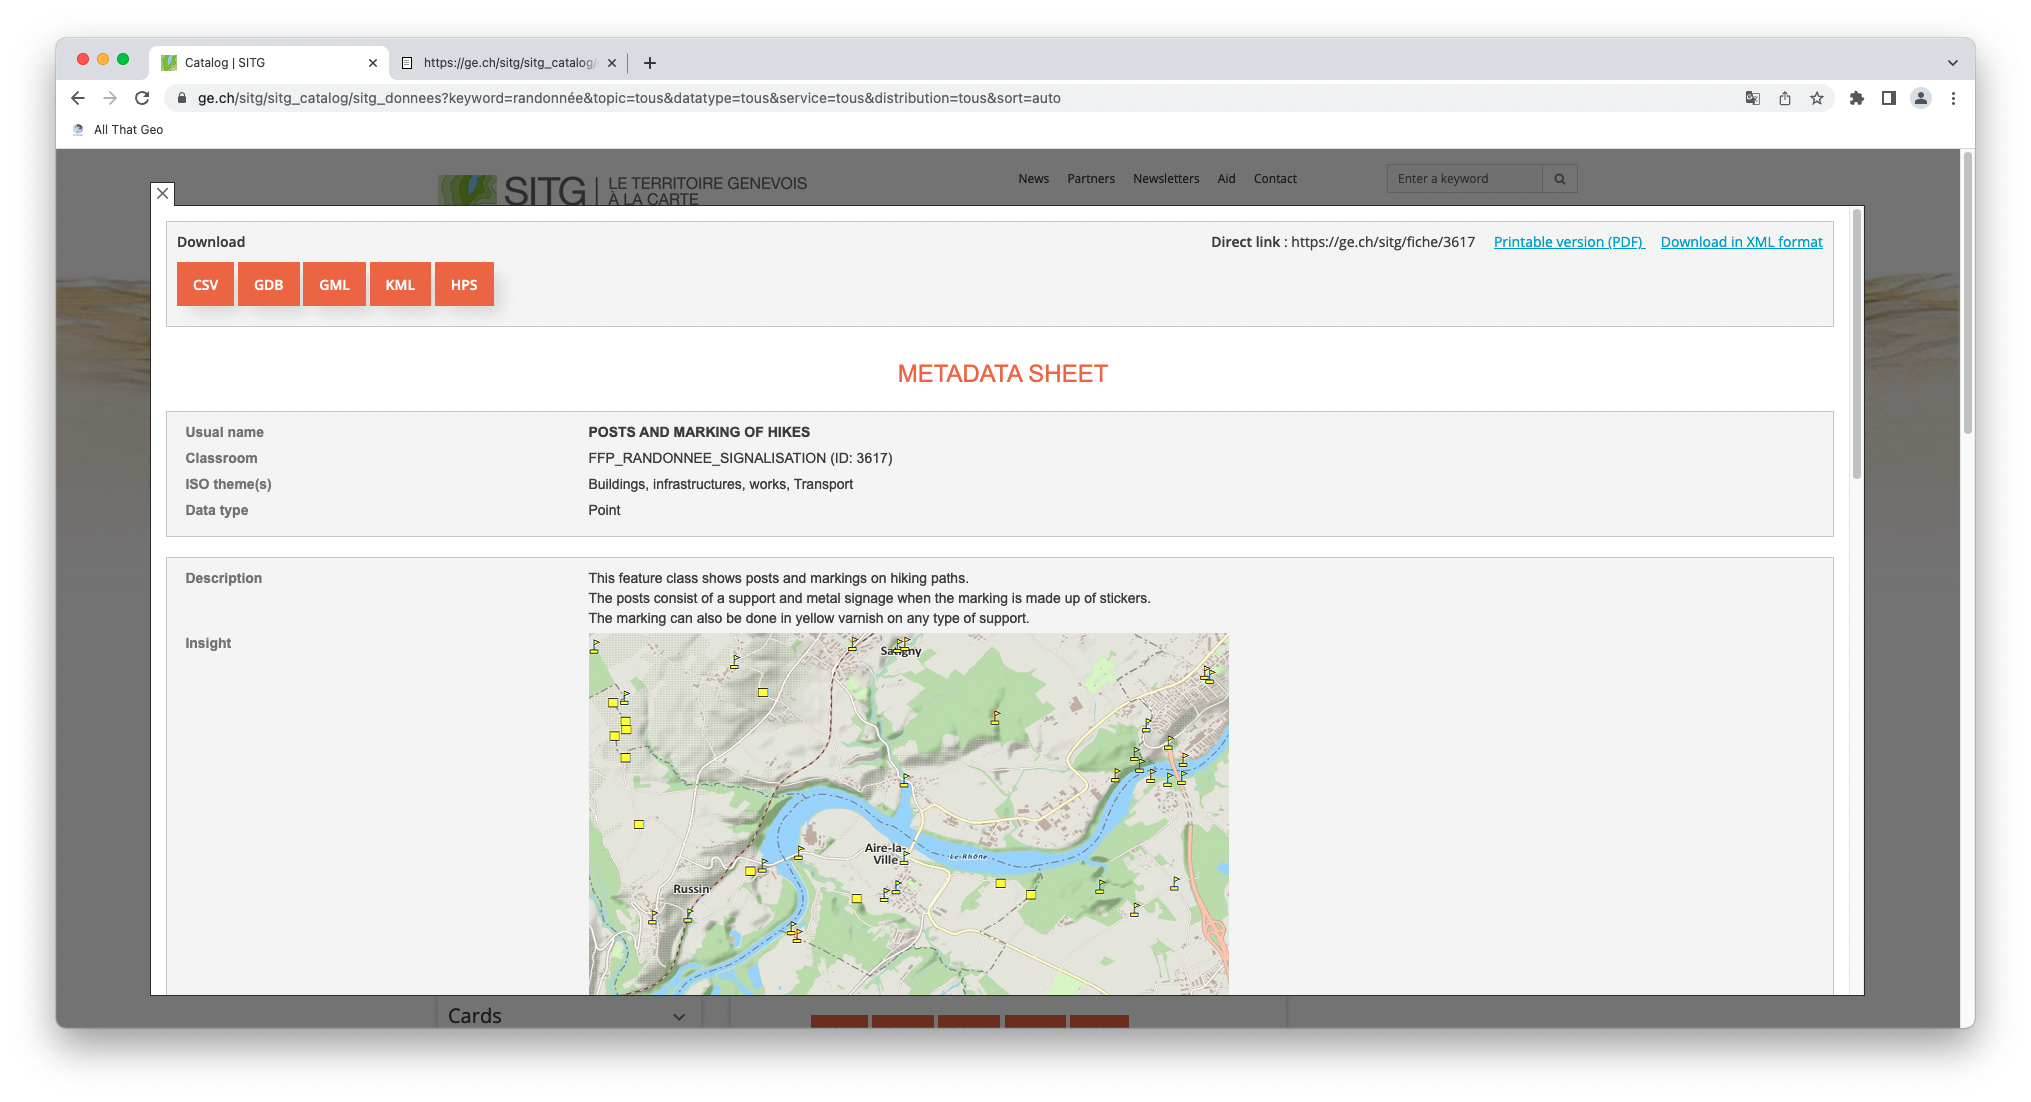
Click on the Esri ArcGIS Rest link: https://ge.ch/sitgags1/rest/services/VECTOR/SITG_OPENDATA_02/MapServer/3617.
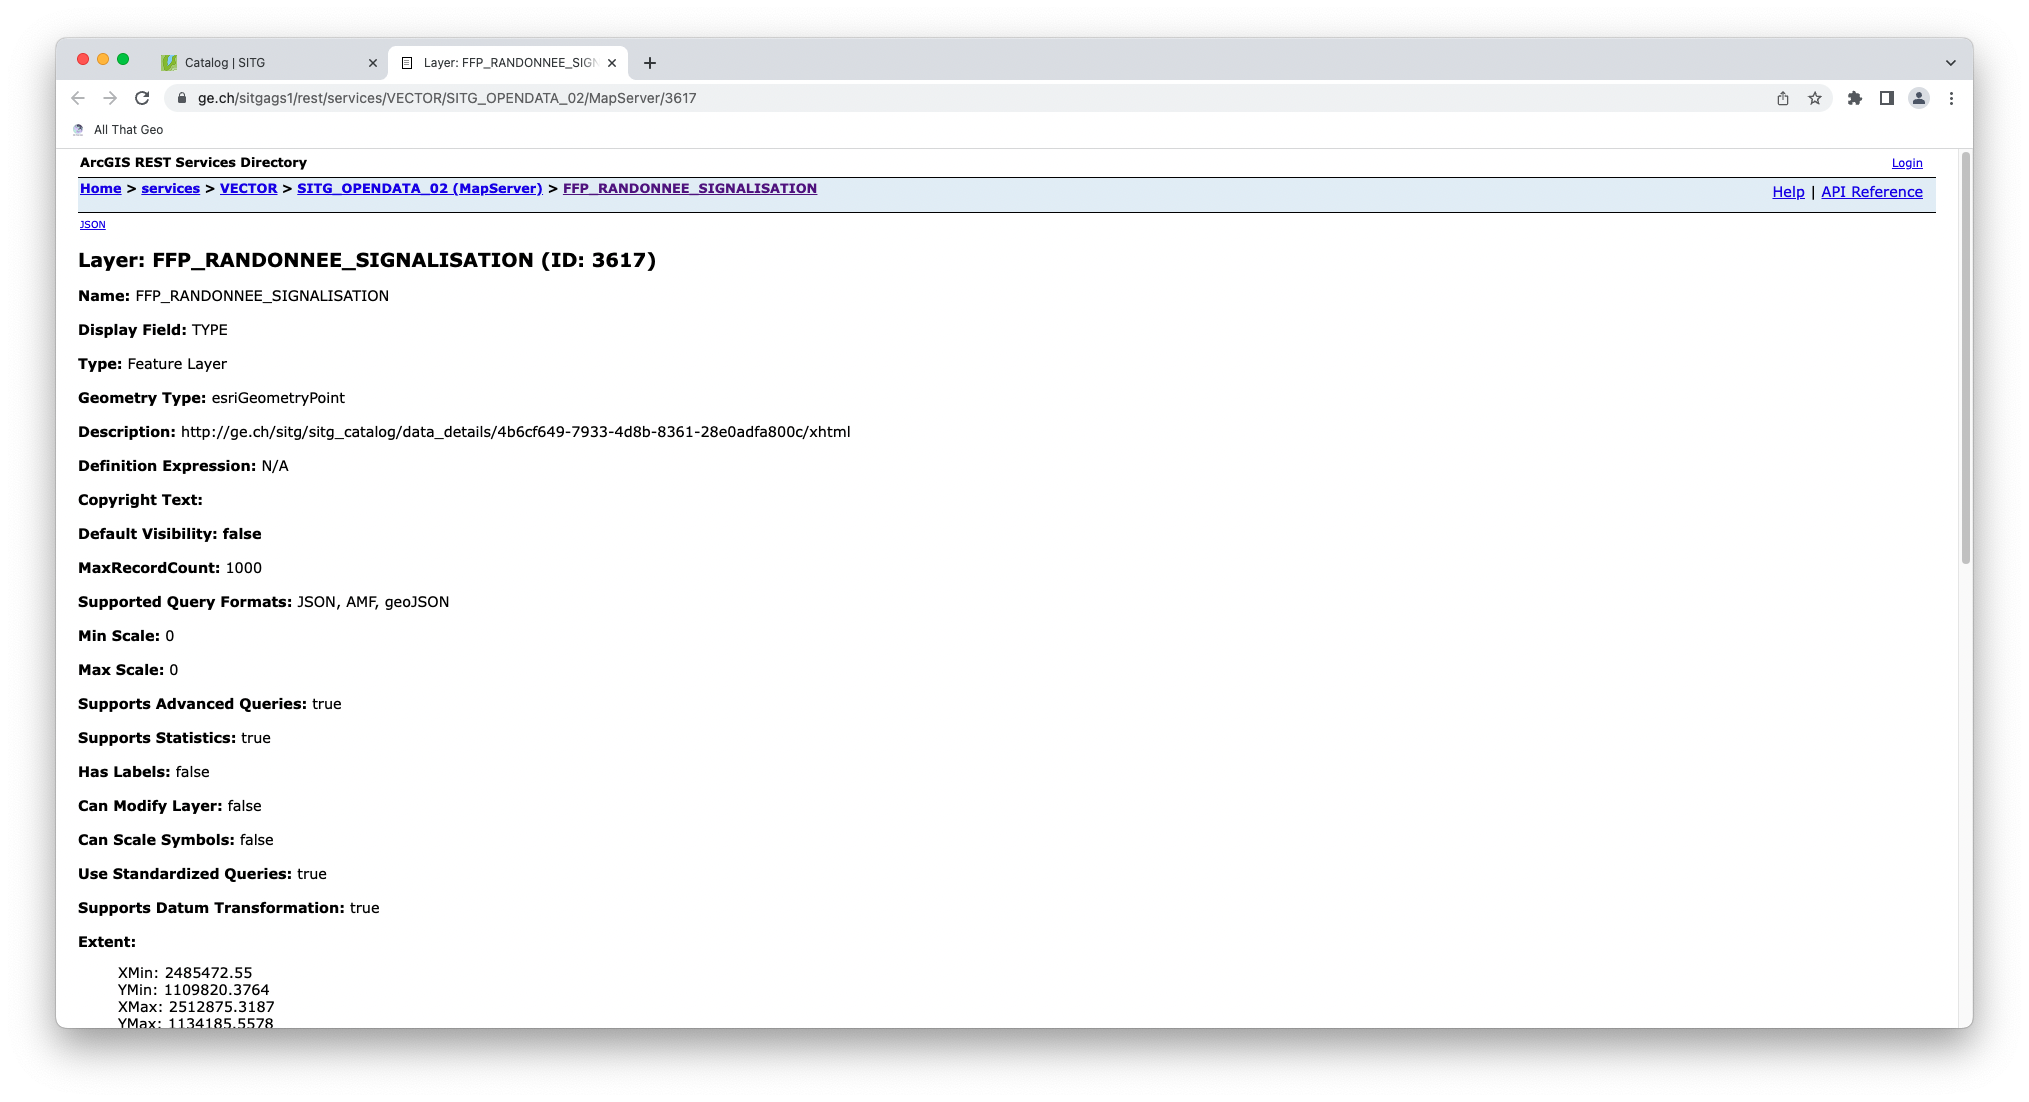
Save this URL for later.
Now go back to the results list and find the HIKING TRAILS dataset. Click on See the complete sheet.
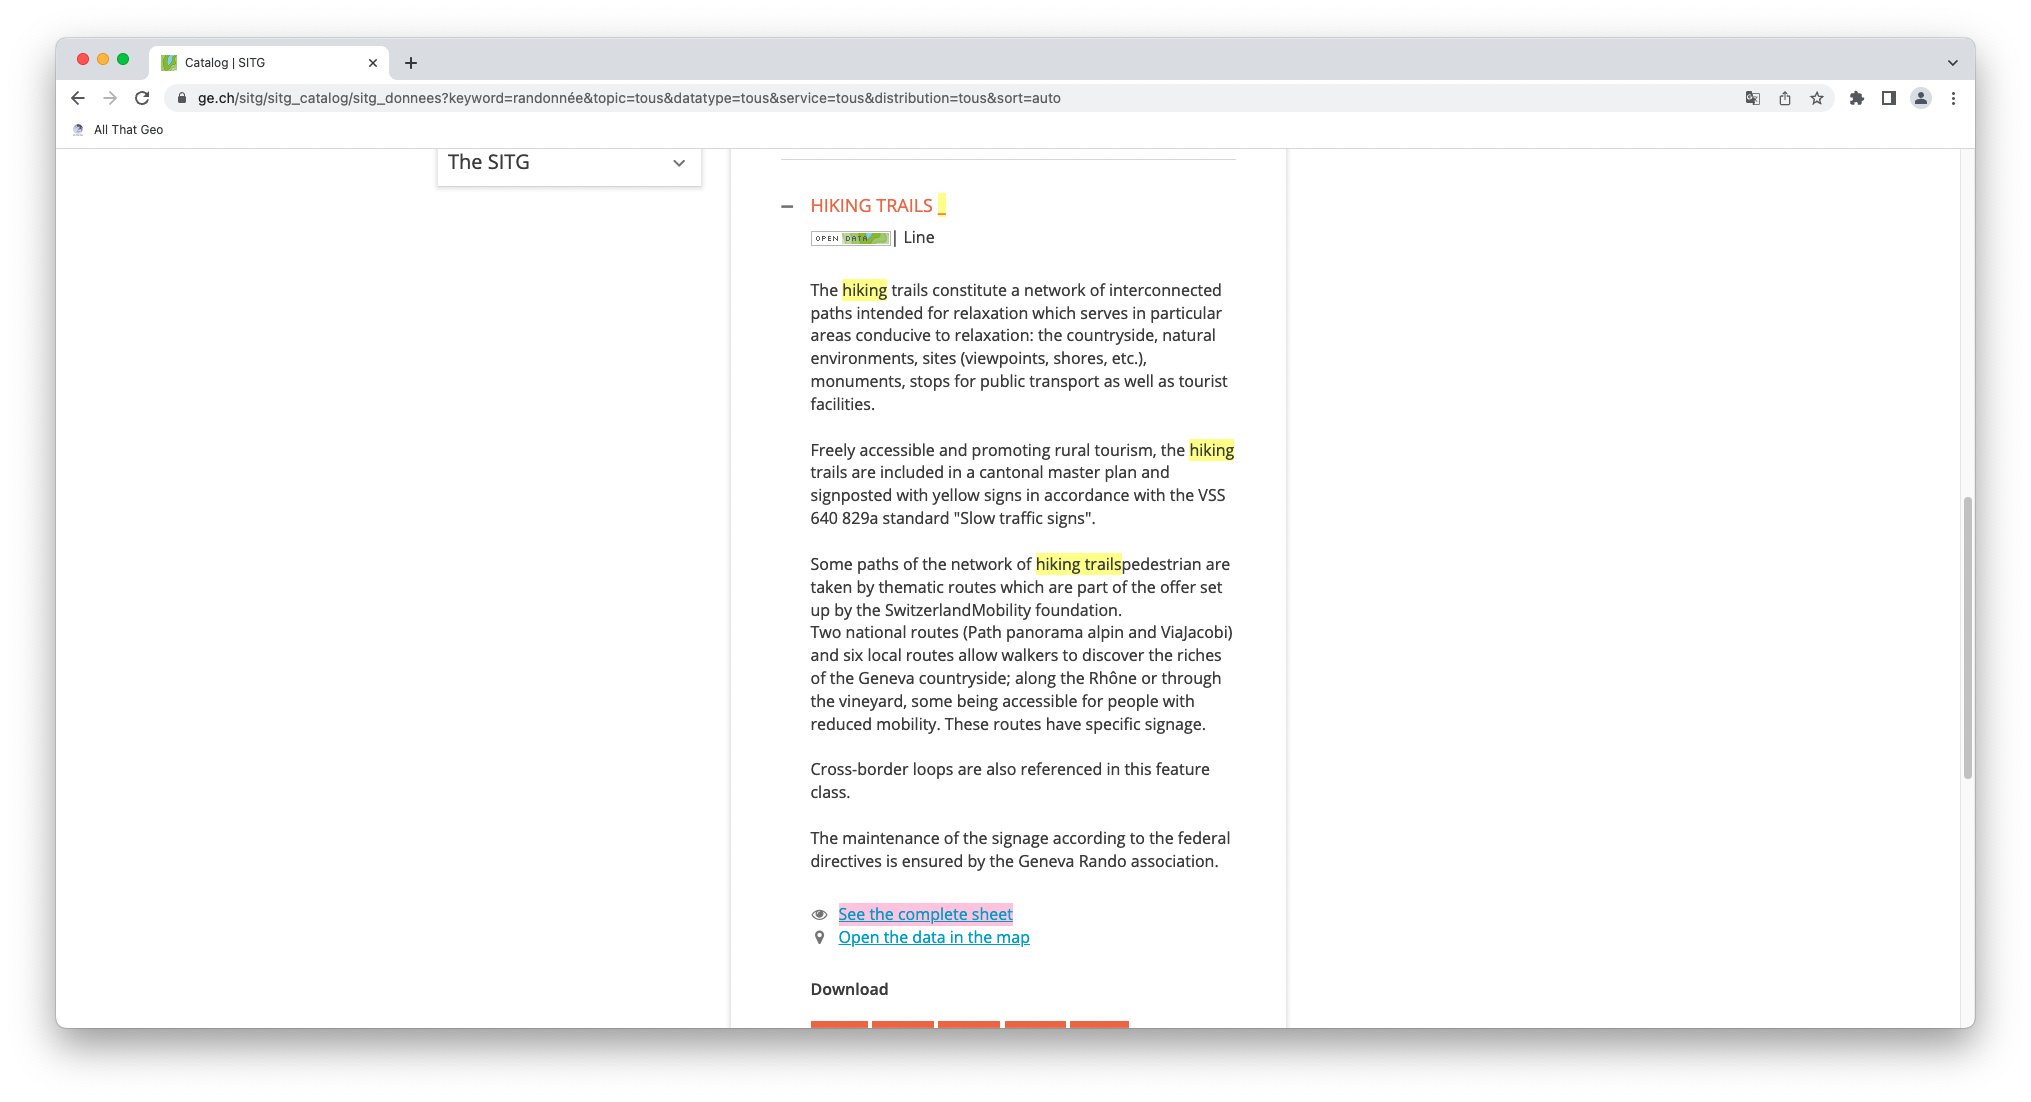
Explore the METADATA SHEET, as you did for the POSTS AND MARKING OF HIKES.
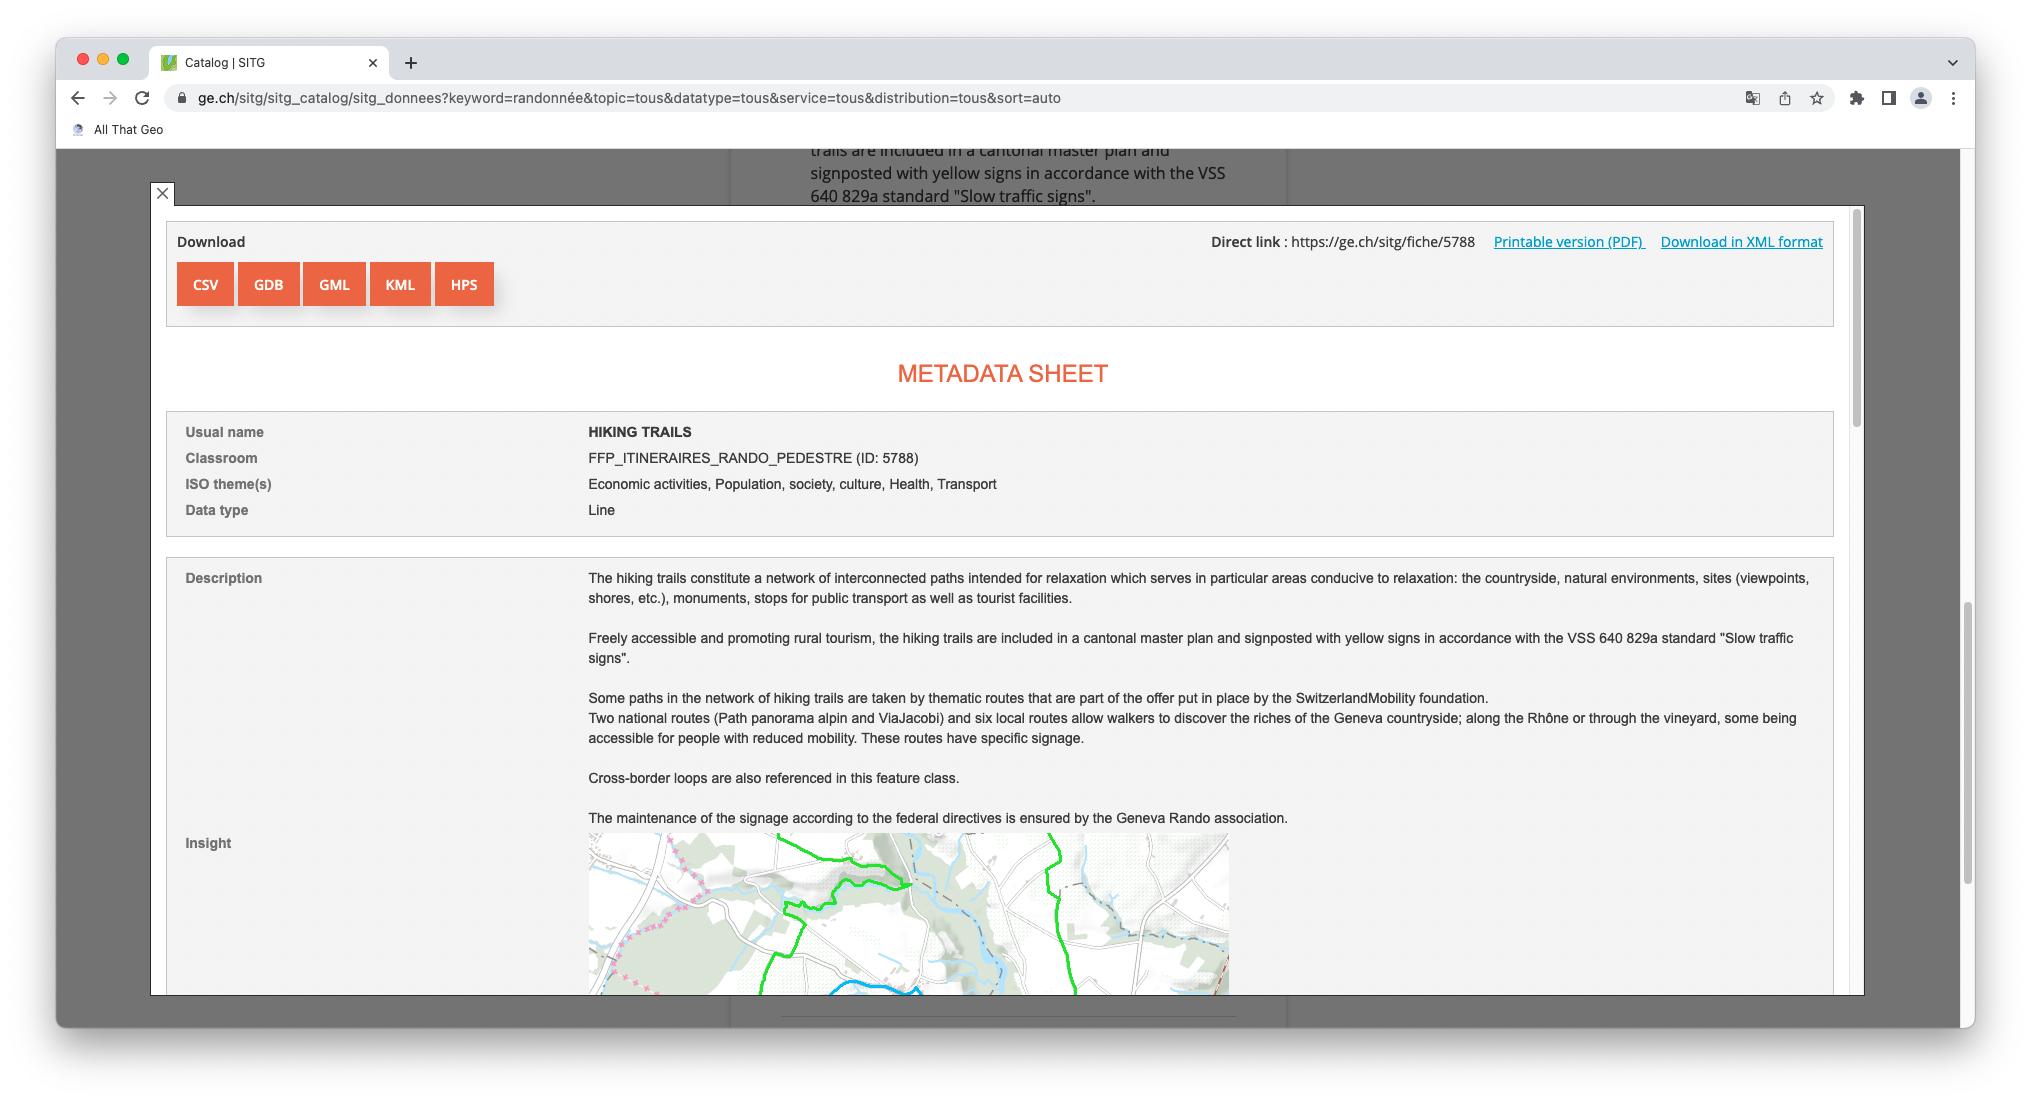
Then, click on the Esri ArcGIS Rest link: https://ge.ch/sitgags1/rest/services/VECTOR/SITG_OPENDATA_02/MapServer/5788.

Save this URL too for later.
3 Create a visualisation
Choose → Prepare → Create → Share
To create a hiking app in 3D, you'll start by creating a web scene with 3D Scene Viewer. Then, we'll use that web scene to feed into an instant app, 3D Viewer.
3.1 Create a web scene with ArcGIS Scene Viewer
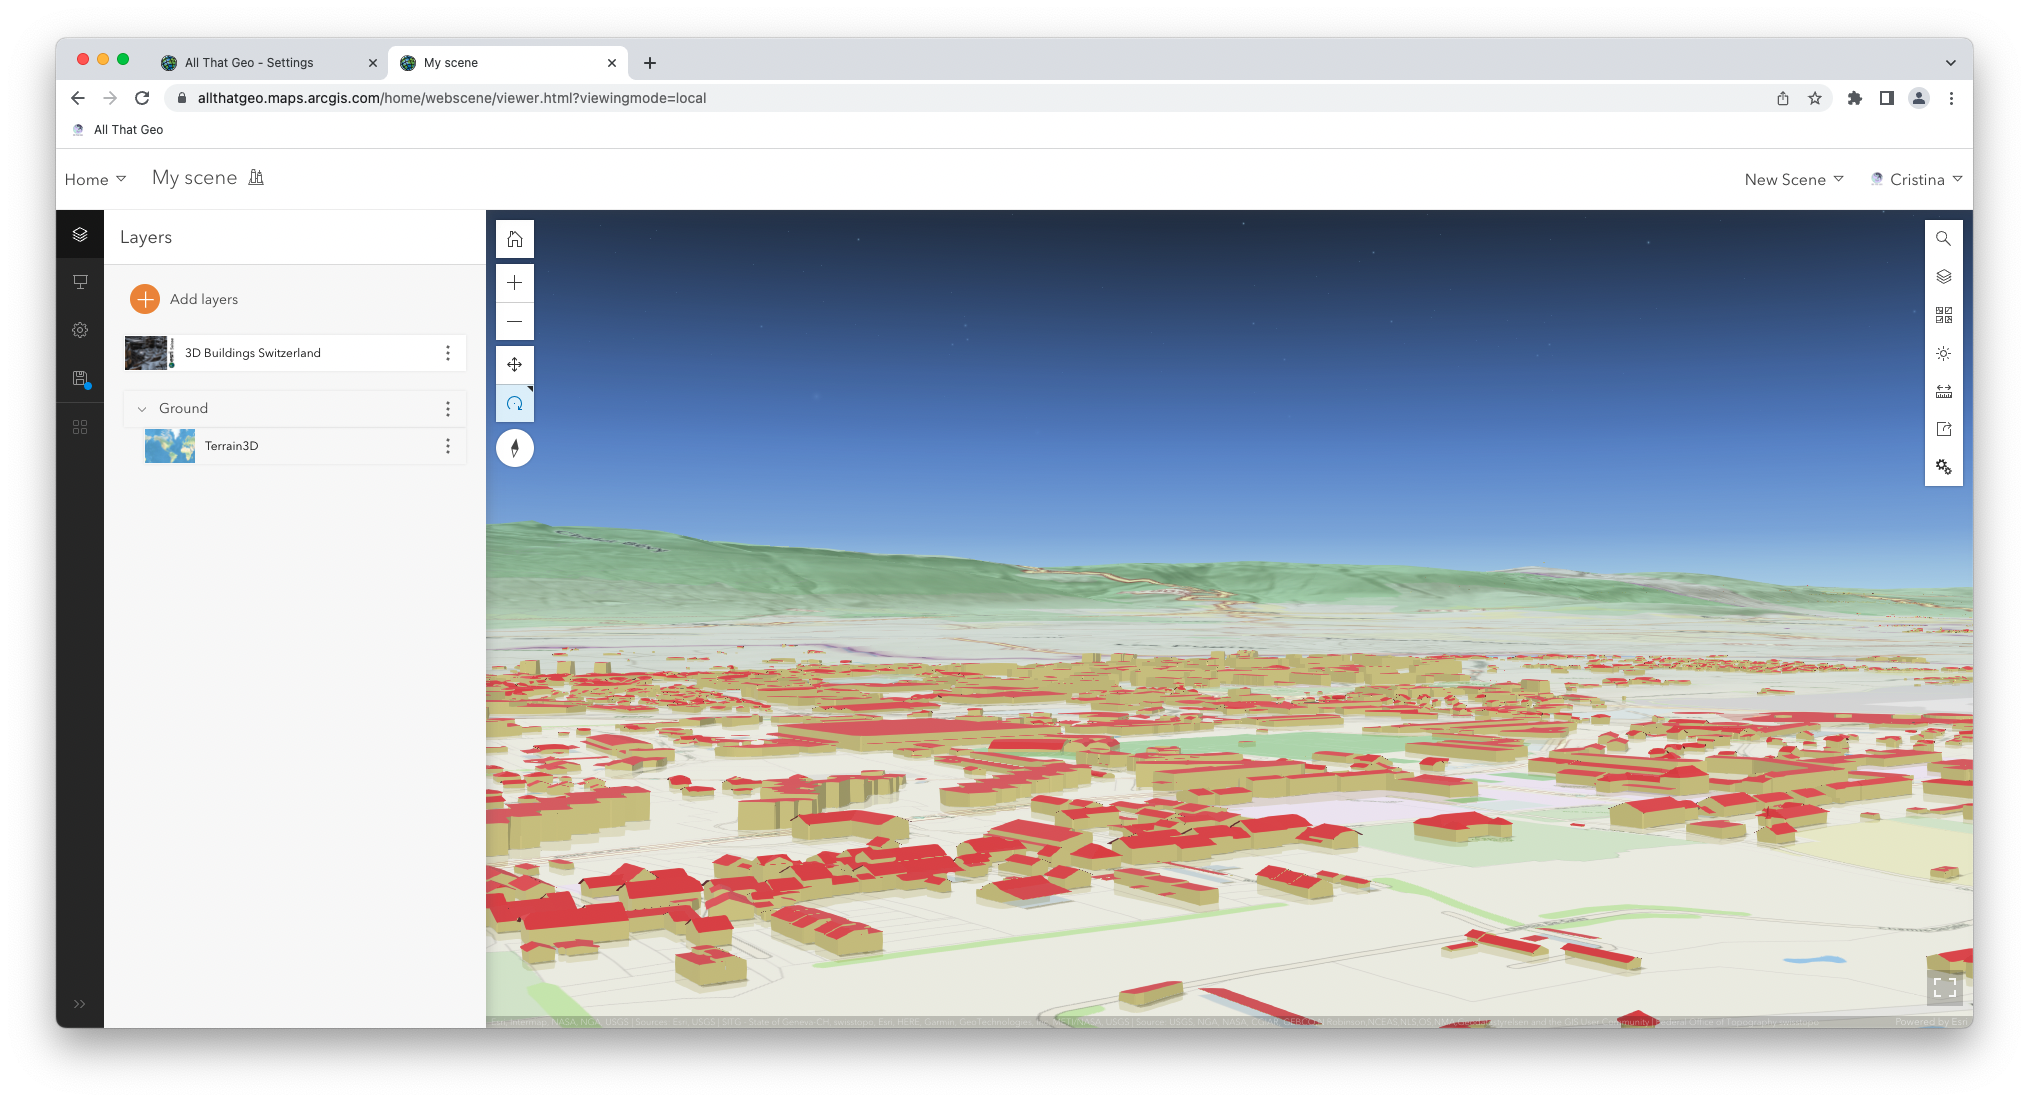
Log in to your ArcGIS Online account.
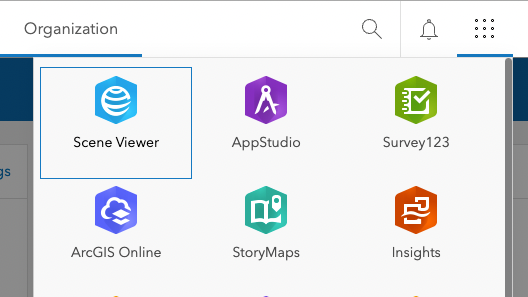
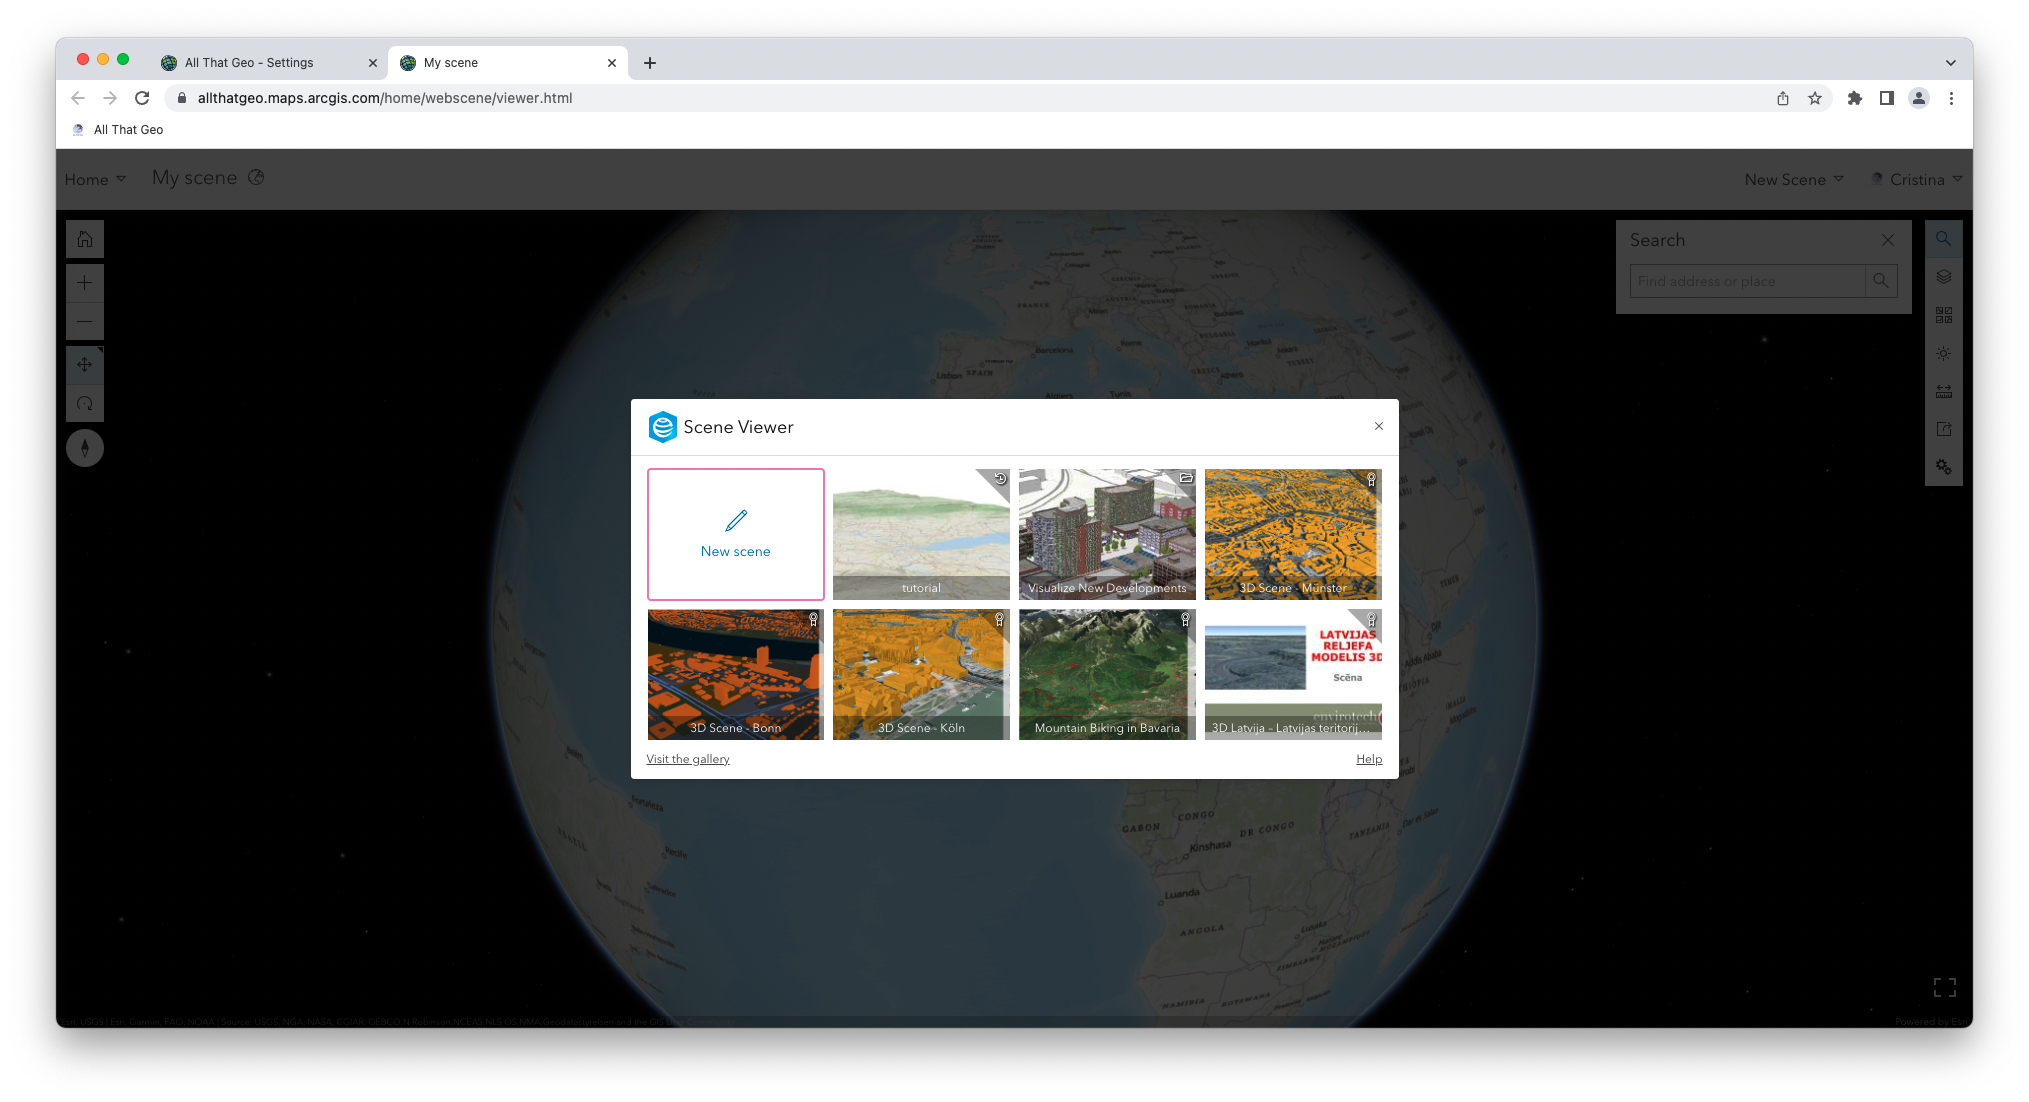
In the App Launcher (the button with the dots in the top bar), choose Scene Viewer.
In the modal window, select New scene.
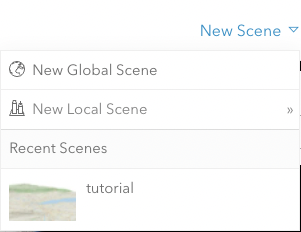
Set up a local scene
Under New Scene (right-hand corner), choose New Local Scene. A local scene is more appropriate than a global scene for a local hiking app such as this one since you'll be working on a city scale that has a fixed extent. In addition, all the data you'll add to the scene will be projected on a planar surface rather than on a sphere.
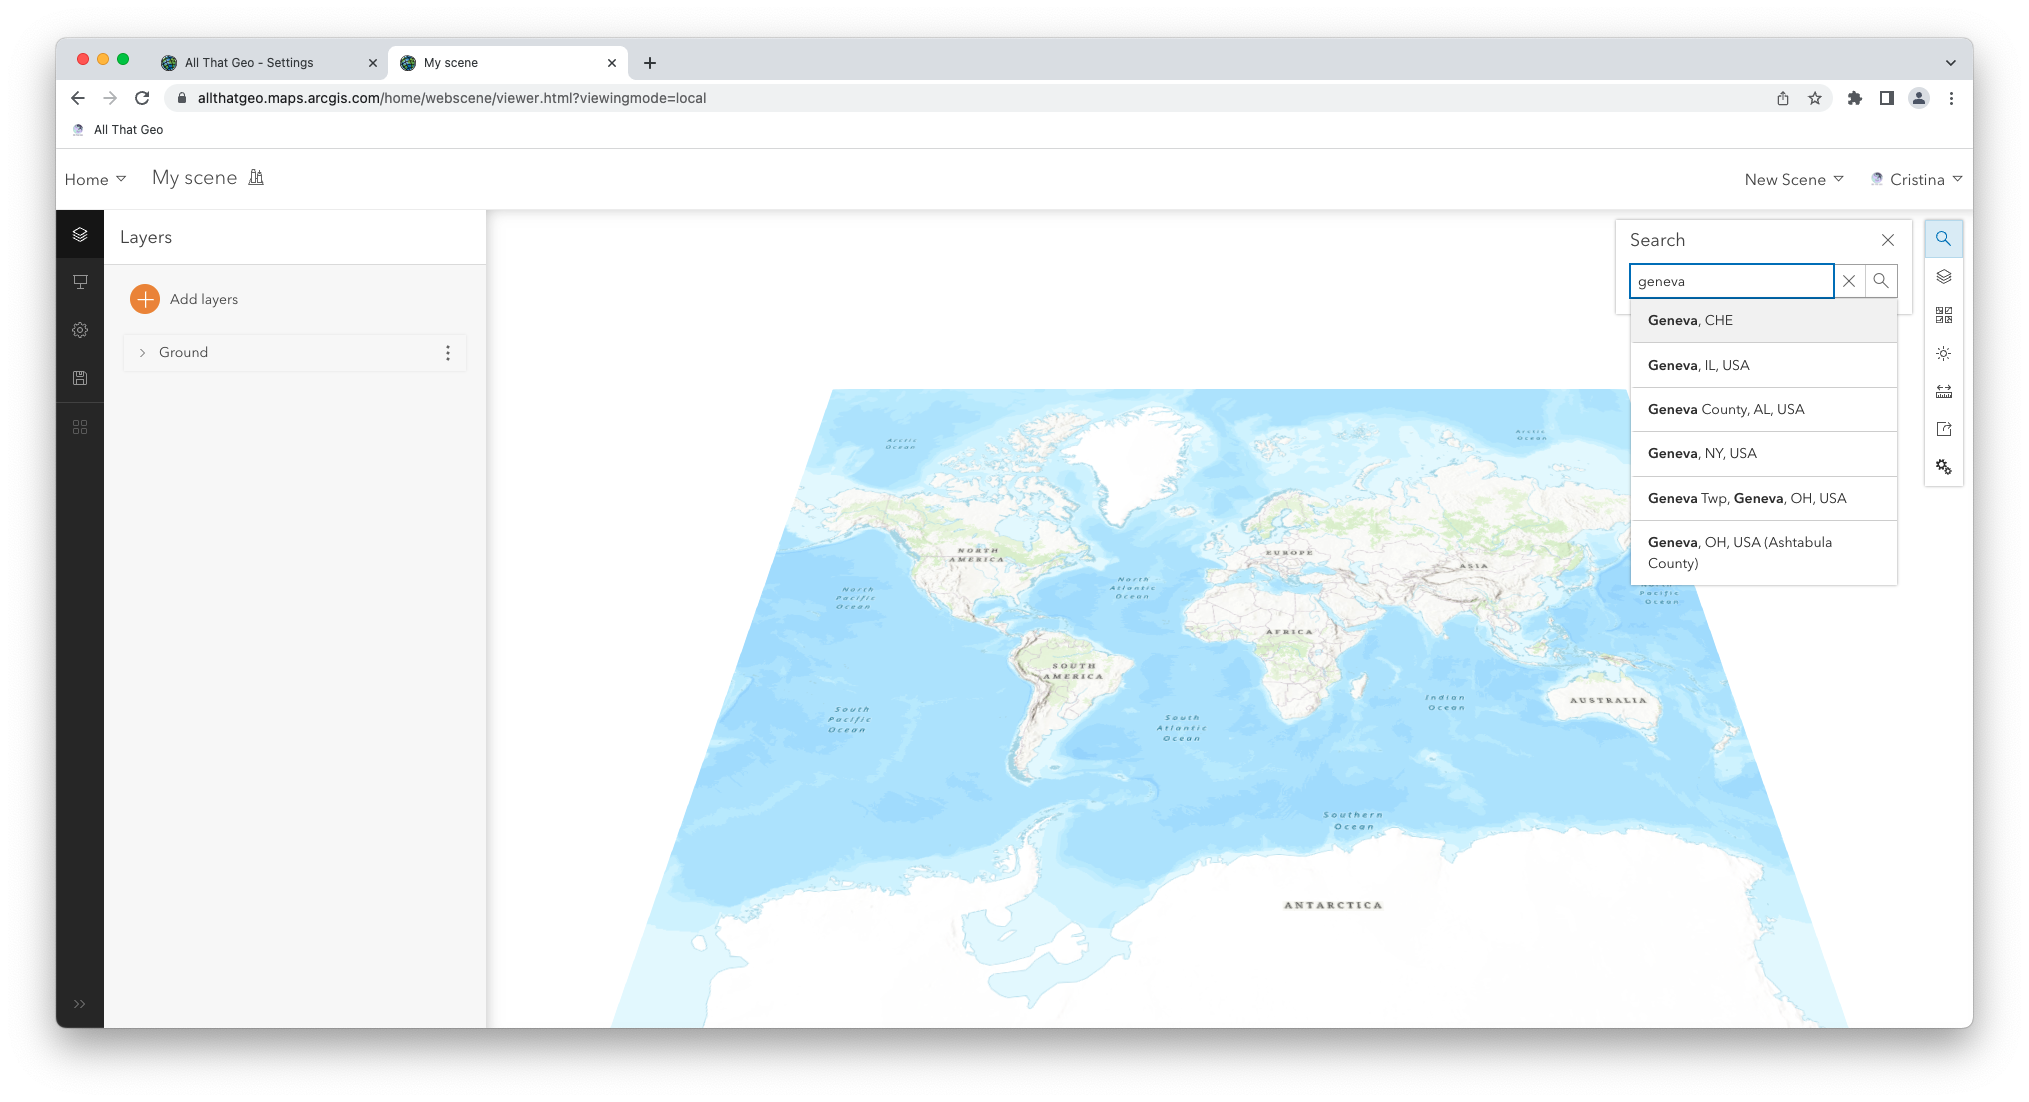
Click on the magnifying glass on the right and Search for Geneva, CHE.
The map is centred in Geneva.
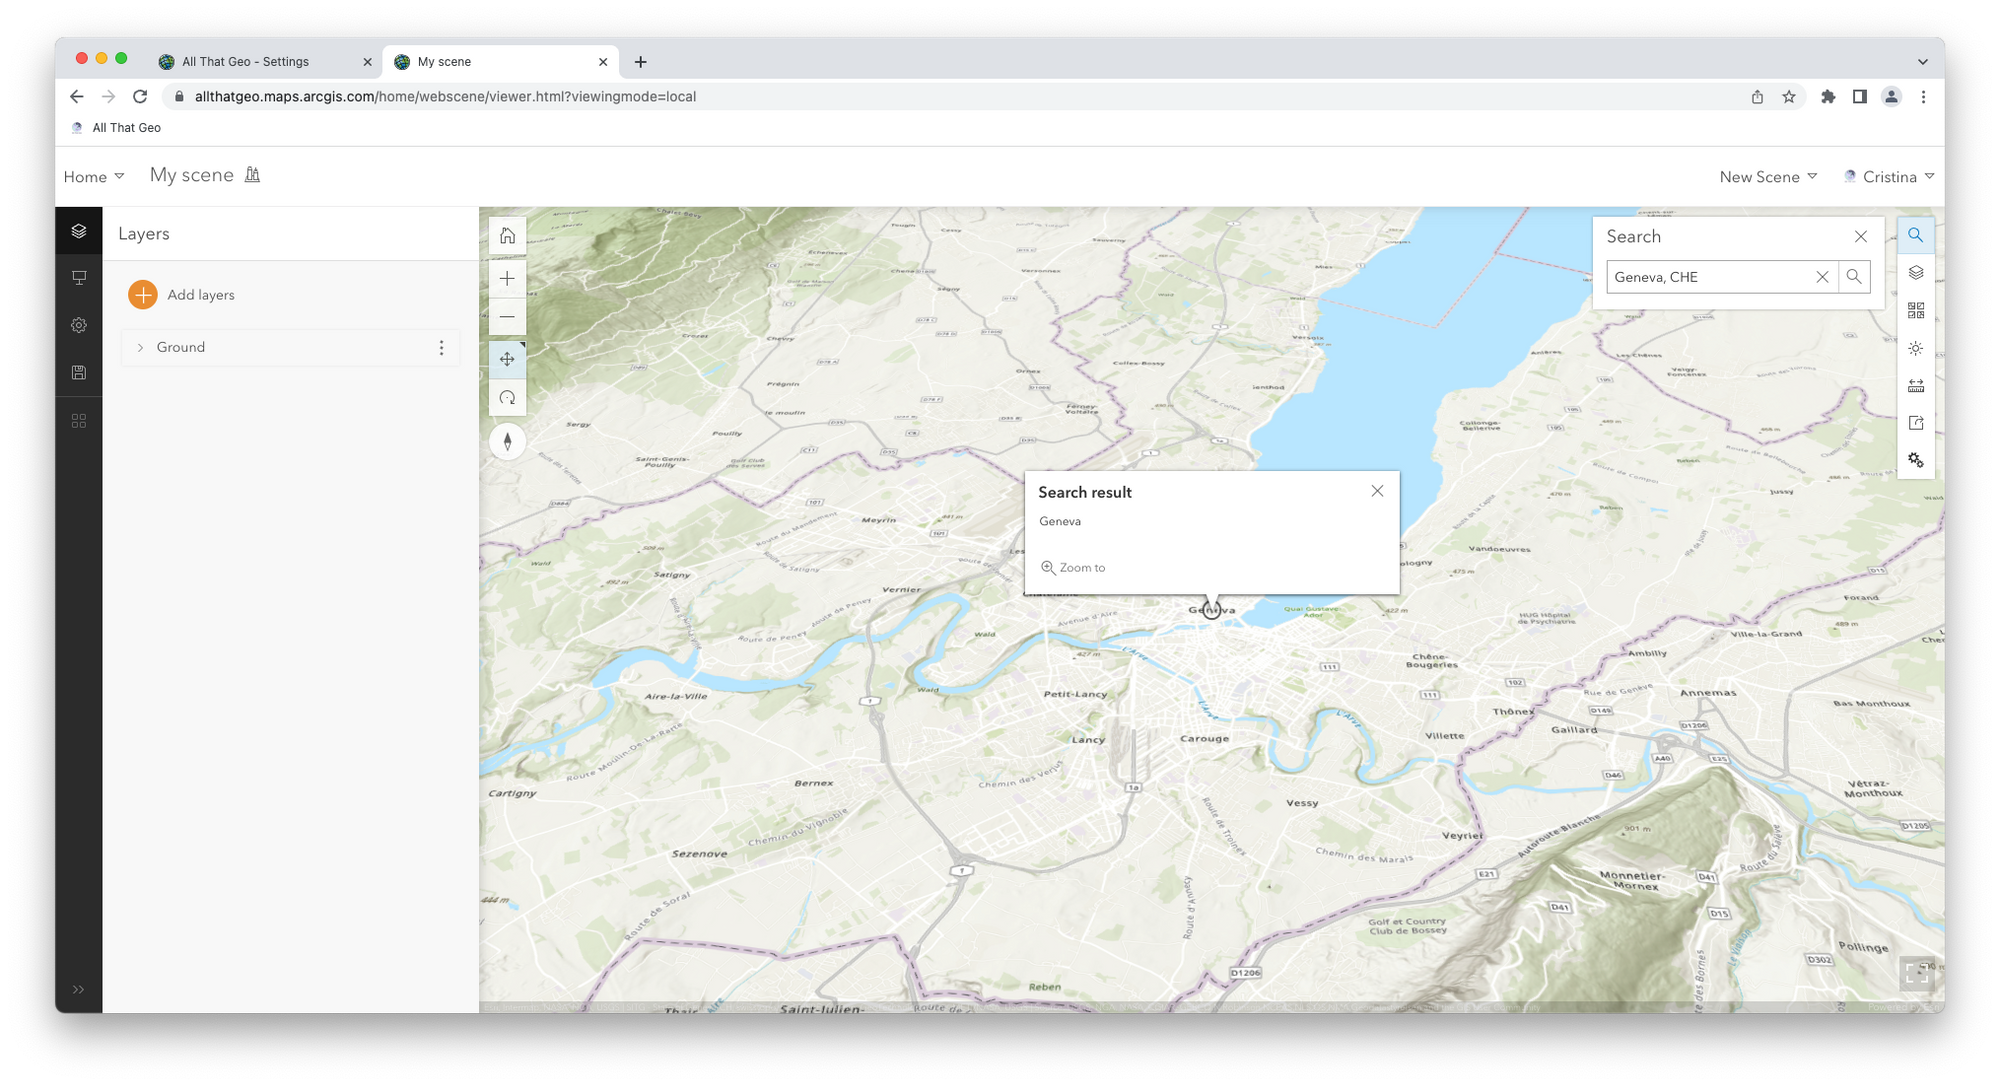
Close the pop-up and the search box.
Choose a basemap
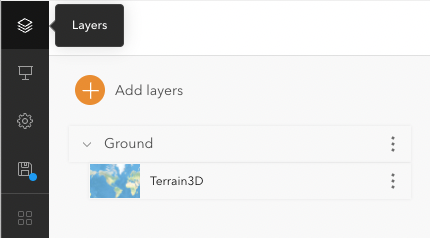
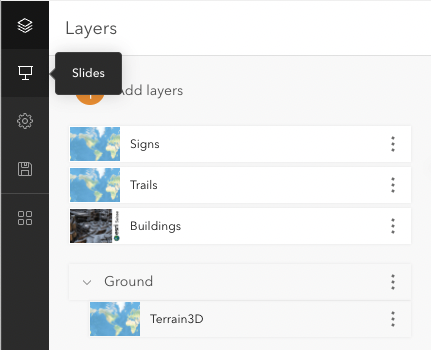
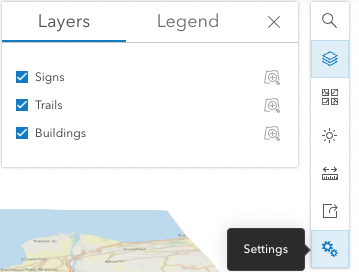
Notice the Layers panel on the left. A scene is composed of three types of layers:
- Ground - displays elevation data. Notice how it has already been added to the scene by default.
- Basemap - provides a geographical context to your scene.
- Layers - geospatial data you choose to feature in your scene.
You can change the basemap by clicking on the Basemap button on the right.
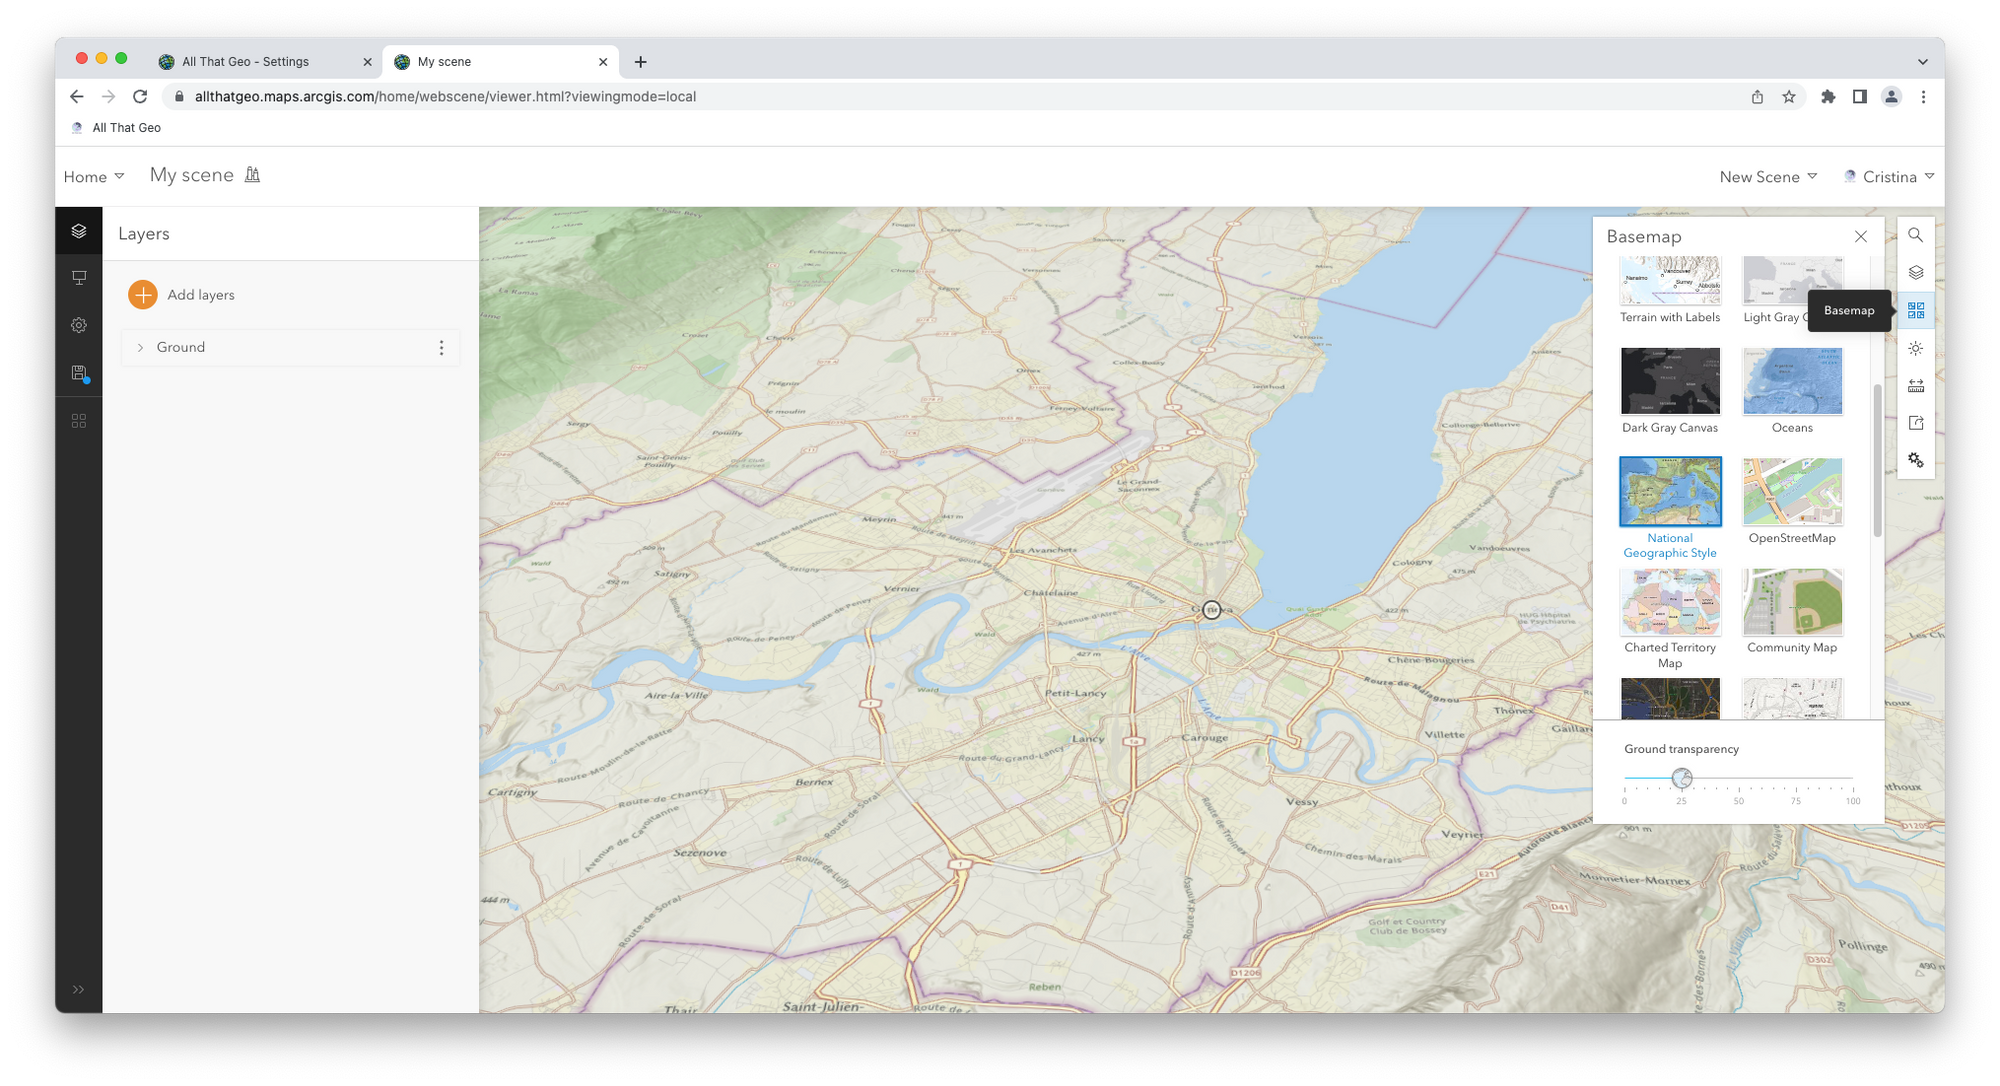
Choose National Geographic Style. Then, close the pane.
Add the buildings layer
Now that we have both the ground and the basemap layers, you can start adding the geospatial data relevant to your scene.
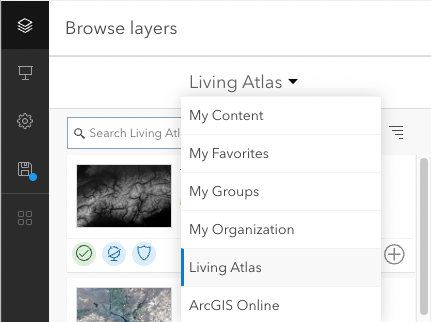
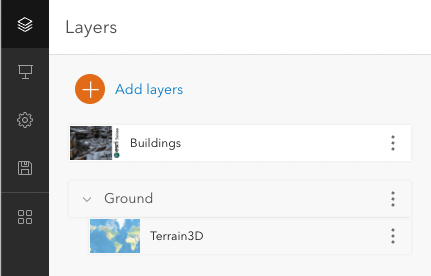
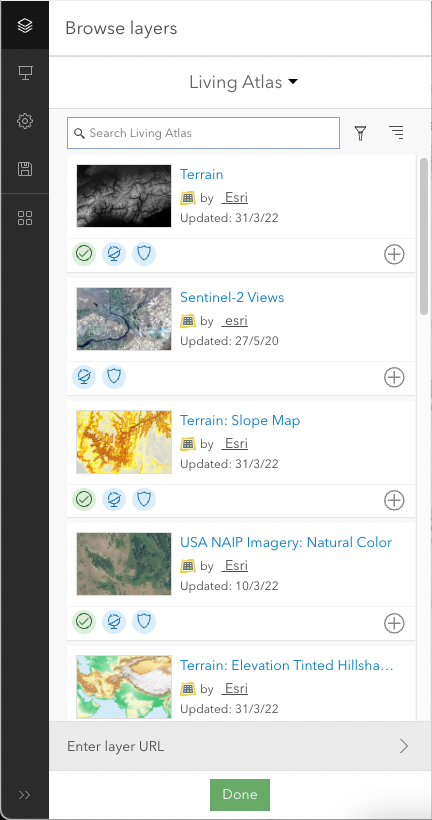
In Layers, click on Add layers.
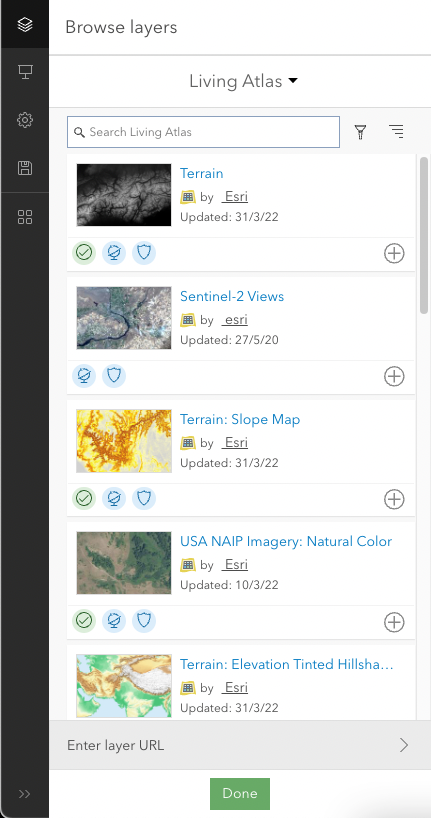
Switch My Content to Living Atlas by clicking on the arrow.
Type' buildings switzerland' in the search box and click on ⊕ next to 3D Buildings Switzerland to add it to the scene. This building layer will provide a valuable context to the visualisation.
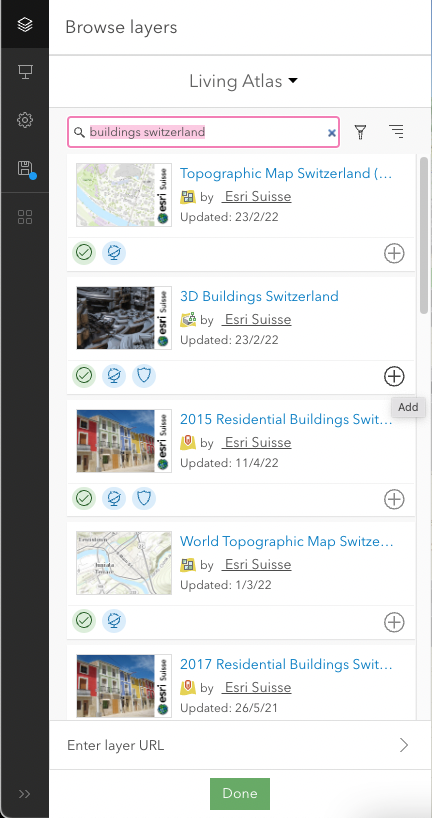
Click Done.
Now explore the layer. Use the navigation tools on the left to move around in three dimensions.
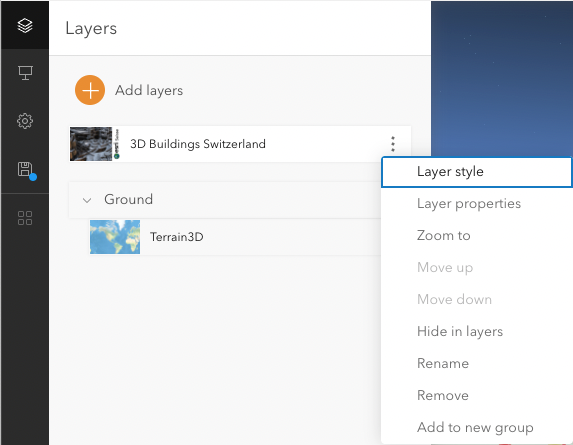
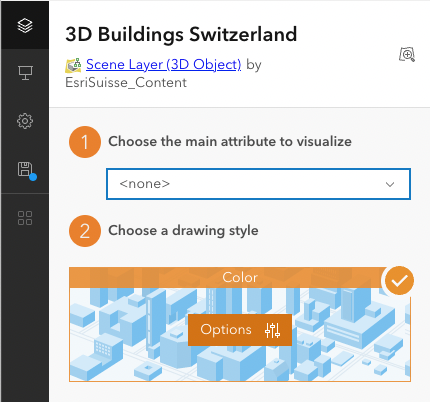
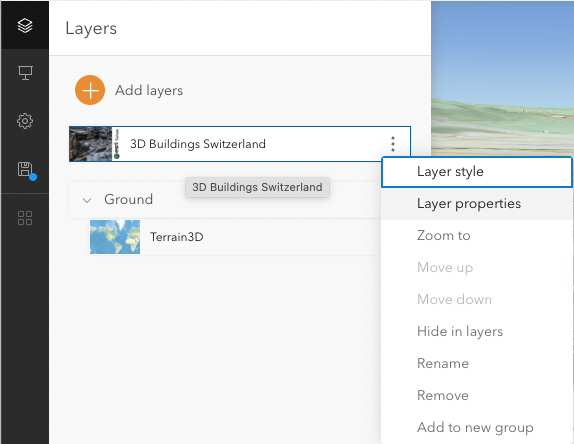
Now click on the three dots next to the layer to access the layer options and choose Layer style.
Under Choose a drawing style, Color, click on Select, and then on Options.
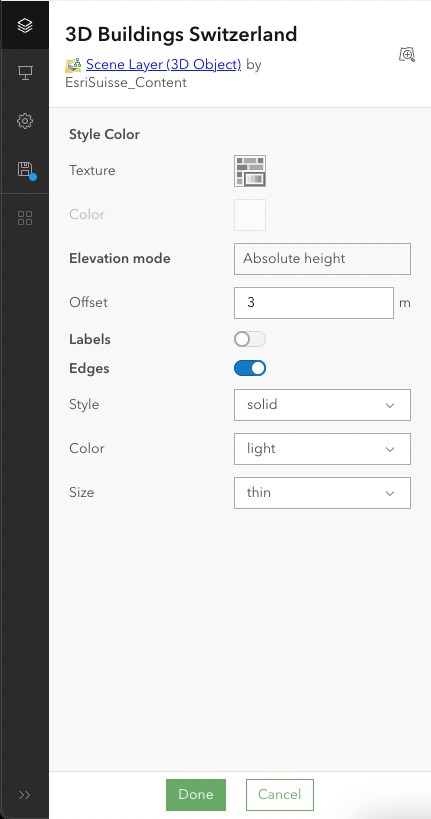
Change the Texture to grey, enter '3' in Offset, and change the Edges to solid, light, thin.
Click Done twice.
Now choose Layer properties from the layer options.
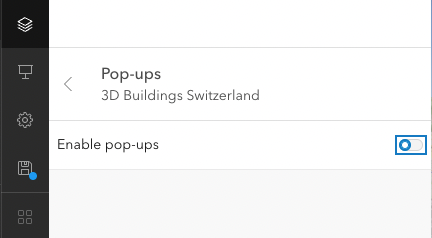
Click on Configure pop-ups and switch off Enable pop-ups.
Go back to the previous window and switch off Show in legend.
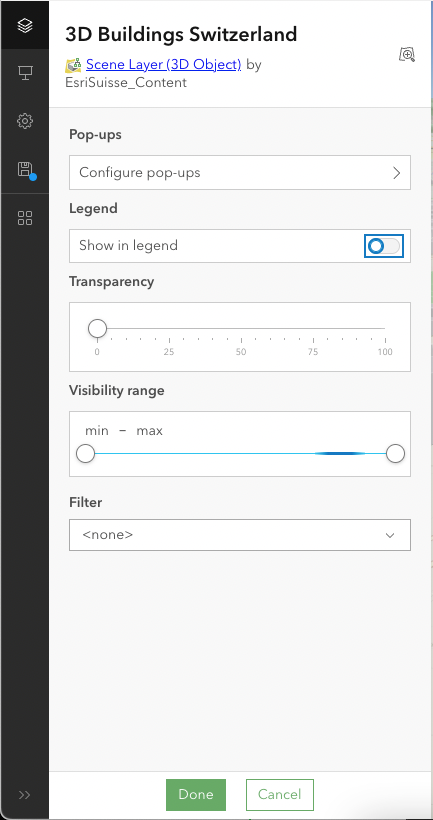
Click Done.
Now choose Rename from the layer options.
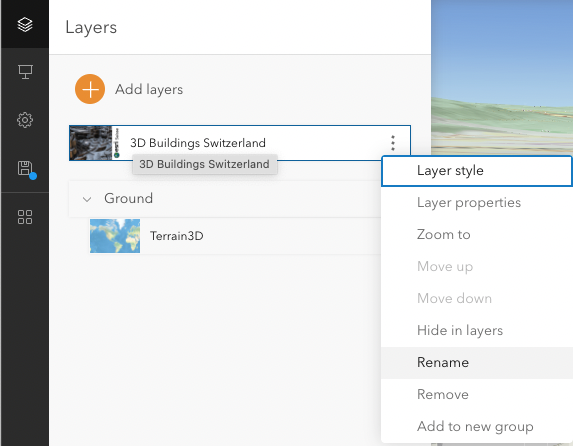
Enter 'Buildings'.
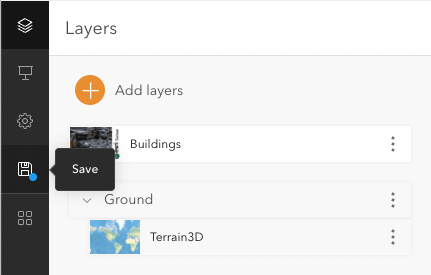
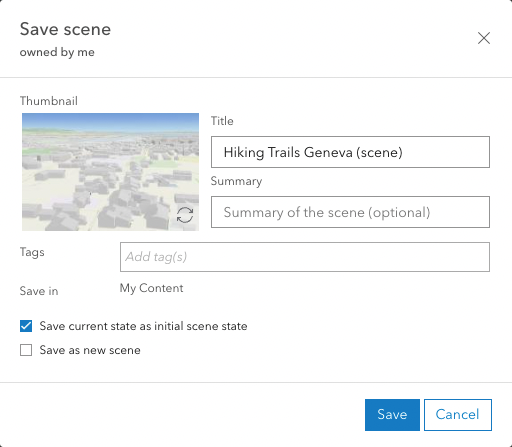
Now is probably a good time to start saving your scene. On the icons bar on the left, choose Save.
In the Save scene modal, enter a Title (e.g. 'Hiking Trails Geneva (scene)').
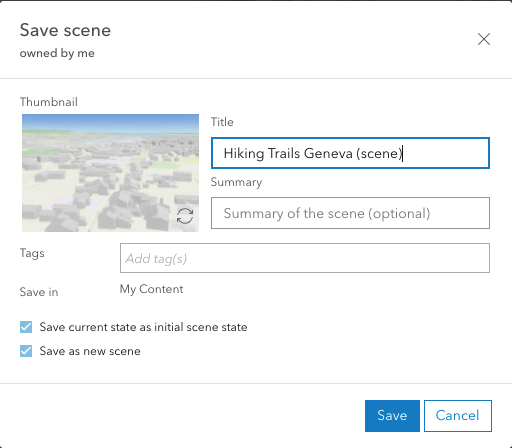
Hit Save.
Add the trails layer
Now you will add the trails data you found on SITG's website earlier. Click on Add layers.
In Browse layers, click on Enter layer URL (bottom of the pane).
Find the first URL you saved earlier (https://ge.ch/sitgags1/rest/services/VECTOR/SITG_OPENDATA_02/MapServer/5788) and paste it into Layer URL. Also, replace the Layer name with Trails.
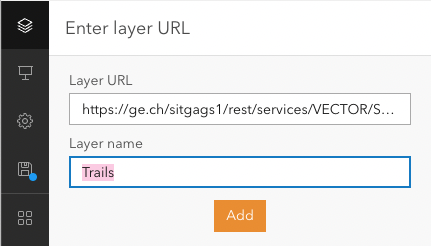
Click Add.
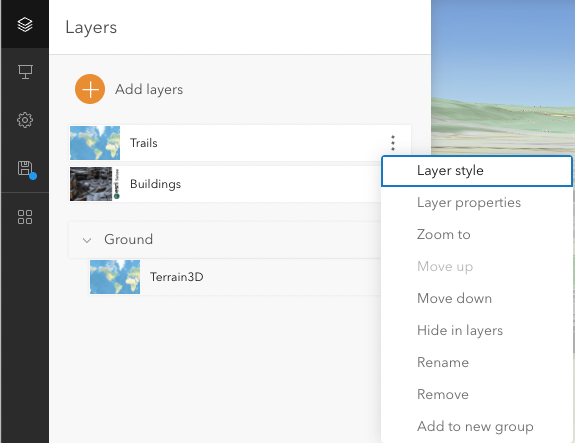
Go back to the Trails layer options (access them in the three dots) and choose Layer style.
Switch to NOM_ITINERAIRE in Choose the main attribute to visualize. Then, under Choose a drawing style, 3D Types, click on Select 3D. Then, click on Options.
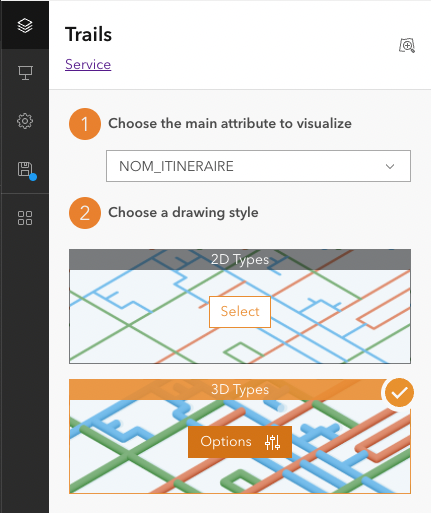
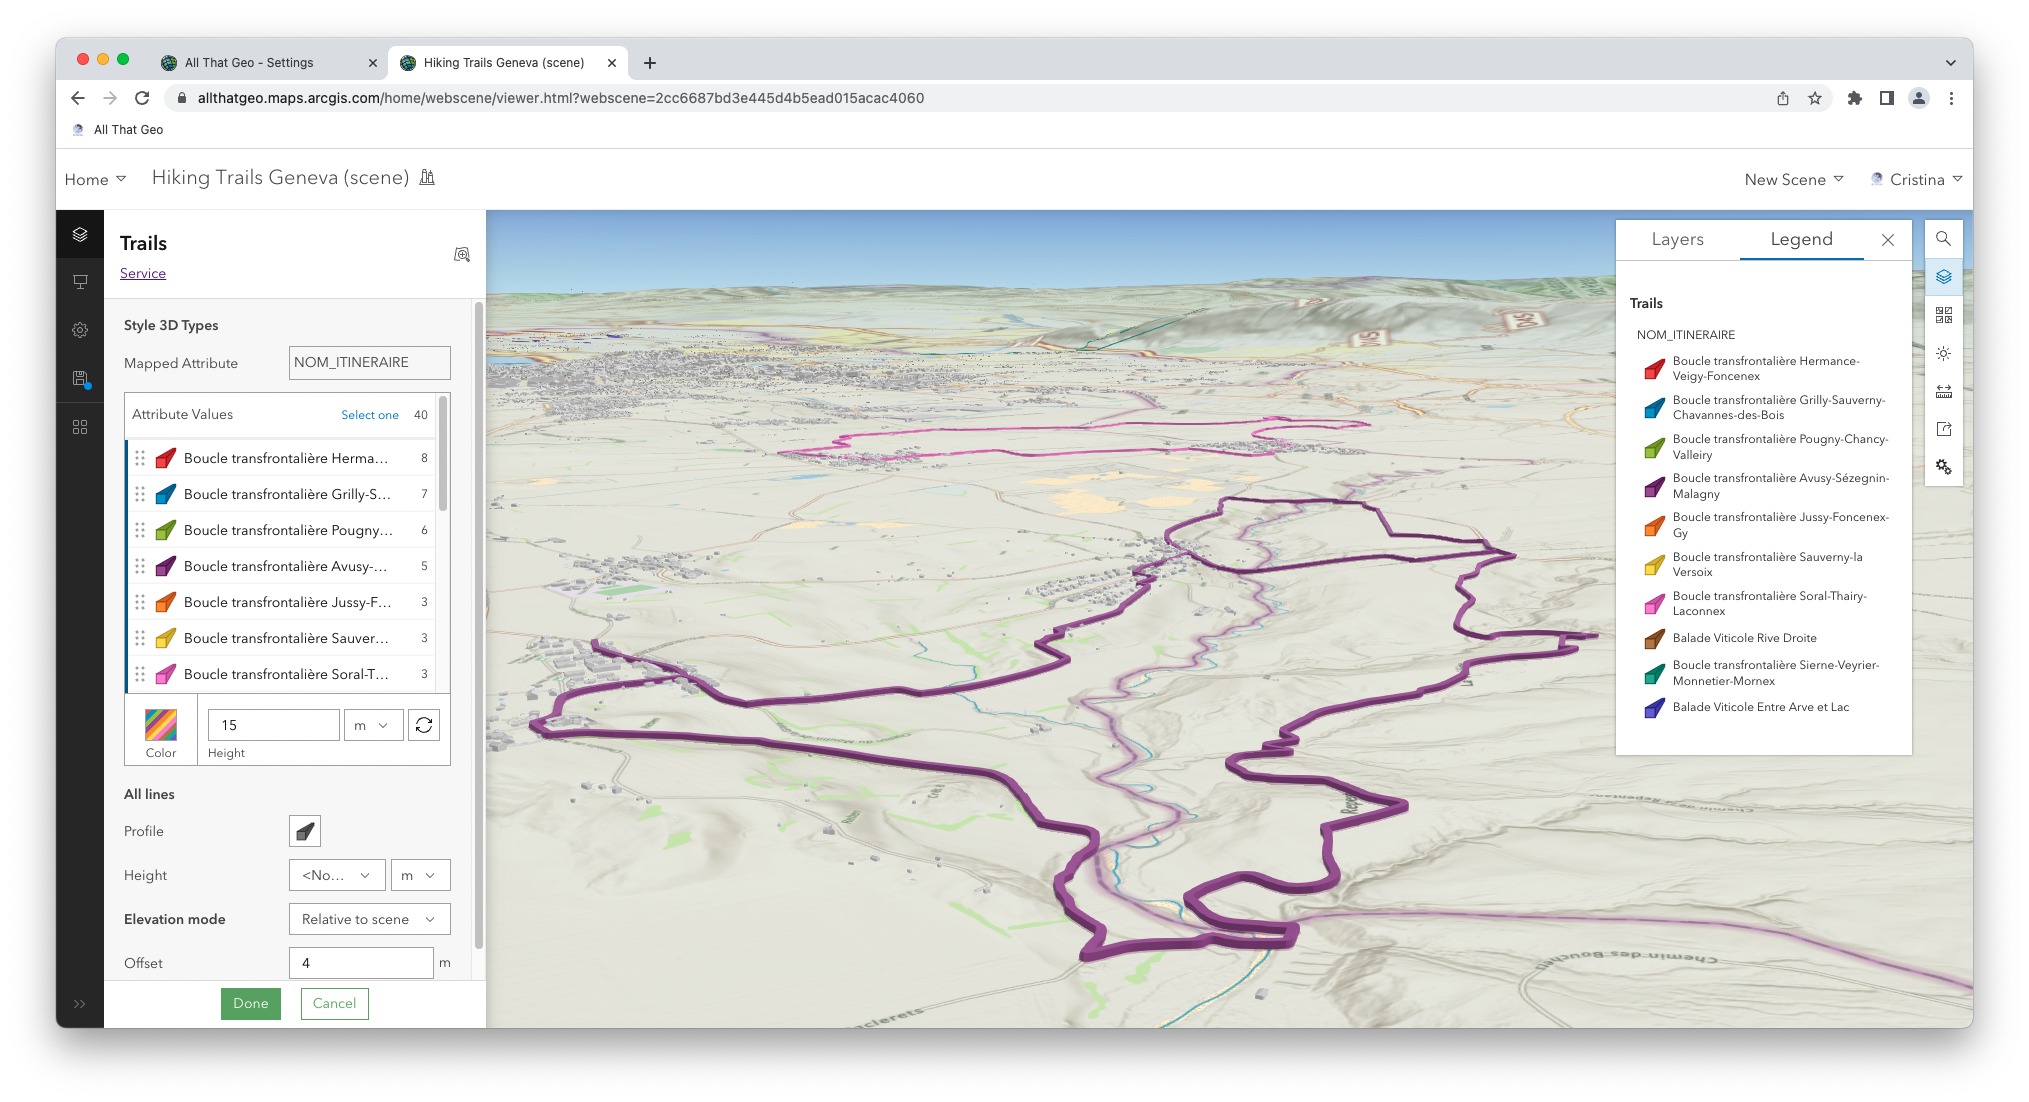
In Attribute Values, click on Select all. Then, change the Profile to the last symbol, the Height to '15', the Elevation mode to Relative to scene, and Offset to '4'. You should end up with something similar to this:
Click Done twice.
Go back to the Trails layer options and choose Layer properties.
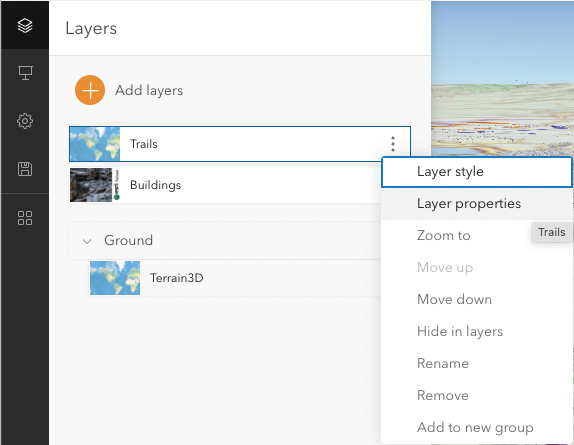
Enable Show in legend and set the Visibility range to 1:50,000 (lower limit).
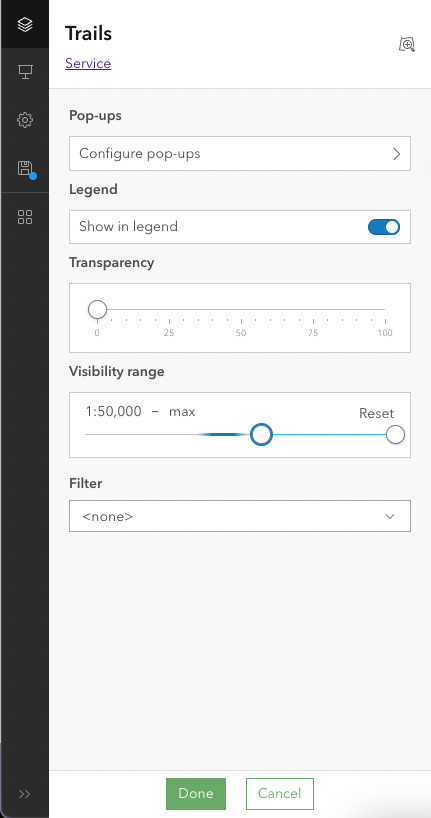
Click on Configure pop-ups and Enable pop-ups. Then, click on Configure fields.
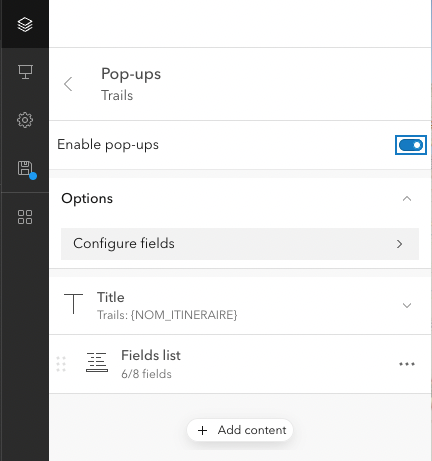
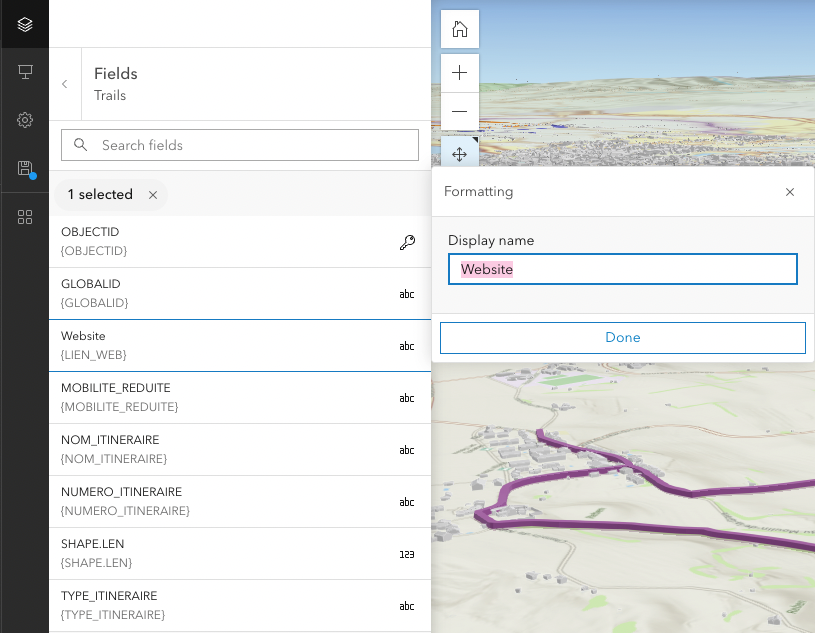
Start by clicking on LIEN_WEB. You'll translate this field name so it shows in English in the pop-ups.
Enter 'Website' under Display name. Click Done.
Now, repeat the process for MOBILITE_REDUITE ('Accessible to people with reduced mobility) and NOM_ITINERAIRE ('Name').
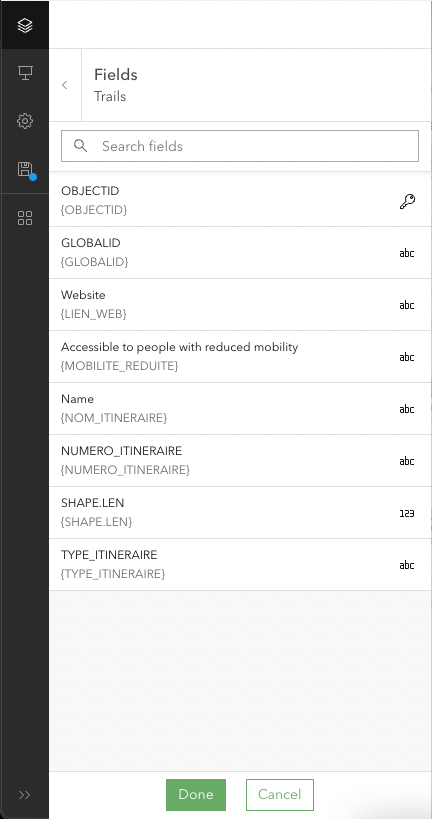
Click Done.
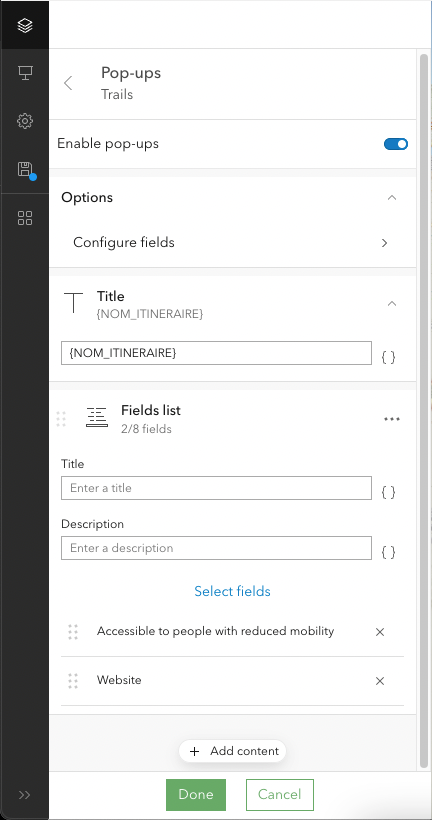
Go back to Pop-ups, expand Title and leave '{NOM_ITINERAIRE}' only.
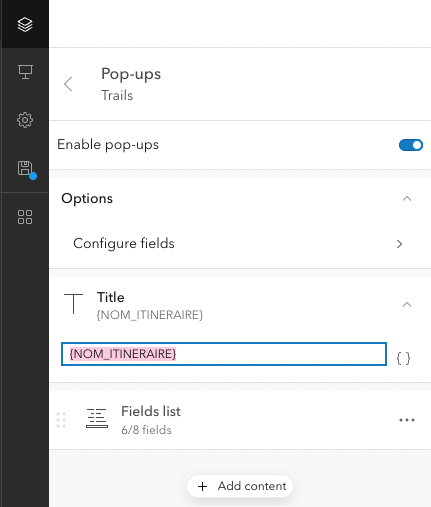
Now expand Fields list. Under Select fields, delete (⤬ sign) all except Accessible to people with reduced mobility and Website.
Click Done twice to leave the layer properties.
Save the scene again, making sure to leave Save as new scene unchecked.
Add the signs layer
After the buildings layer and the trails layer, you're now going to add the signs layer. Click Add layers.

In Browse layers, click on Enter layer URL.
Enter the URL you saved earlier (https://ge.ch/sitgags1/rest/services/VECTOR/SITG_OPENDATA_02/MapServer/3617) in Layer URL and enter 'Signs' under Layer name.
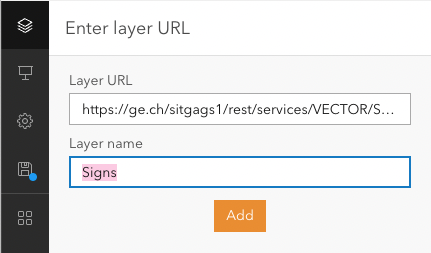
Click Add.
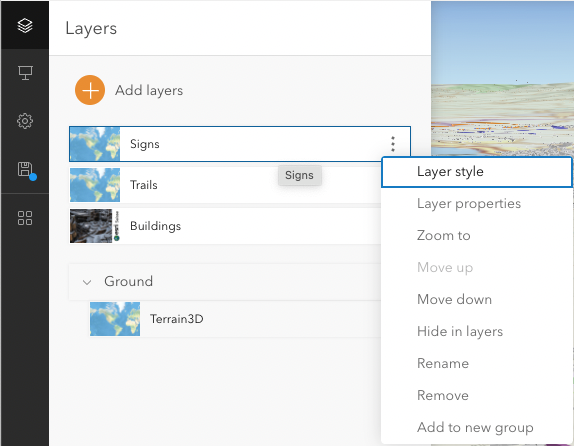
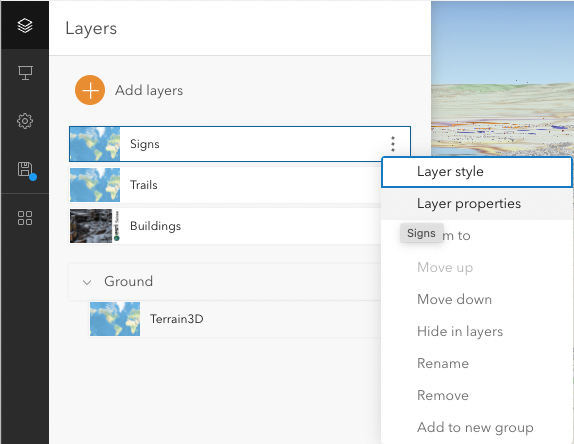
In Signs layer options, select Layer style.
Select TYPE in Choose the main attribute to visualize. Then, under Choose a drawing style, 3D Types, click on Select and then on Options.
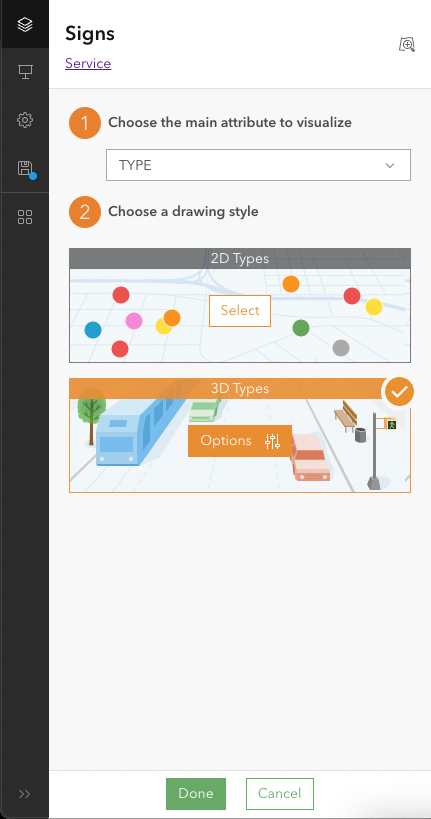
Under Attribute Values, click on poteau and write 'Post'. Then, click on marquage and write 'Mark'. Next, change the symbology by clicking on Select all and choosing a symbol from Marker. Also, enter '25' in Size. Then, click on Select one and change the Post Color to orange and Mark to red. Finally, select Relative to scene next to Elevation mode.
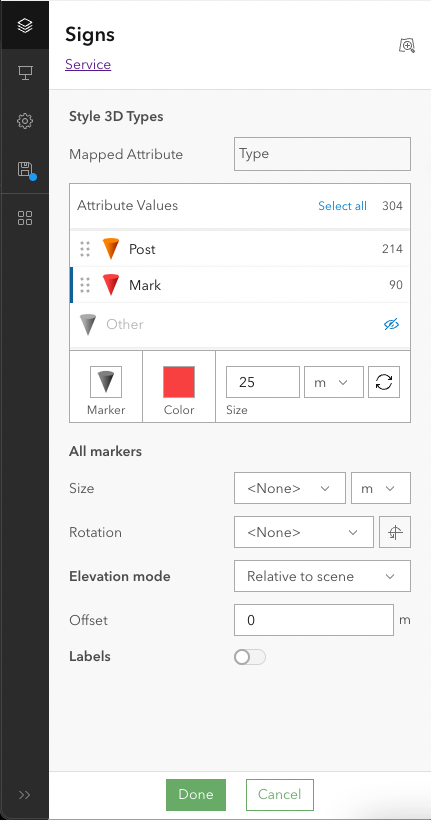
Click Done twice.
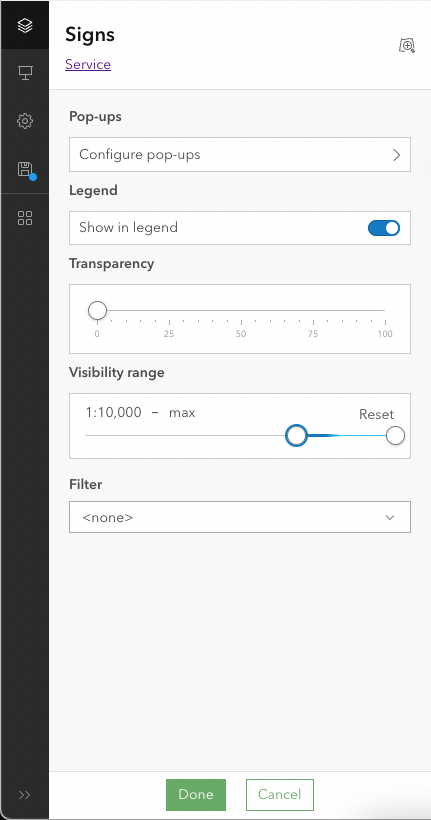
Go back to the Signs layer options and choose Layer properties.
Make sure Show in legend is enabled. Then, click on Configure pop-ups.
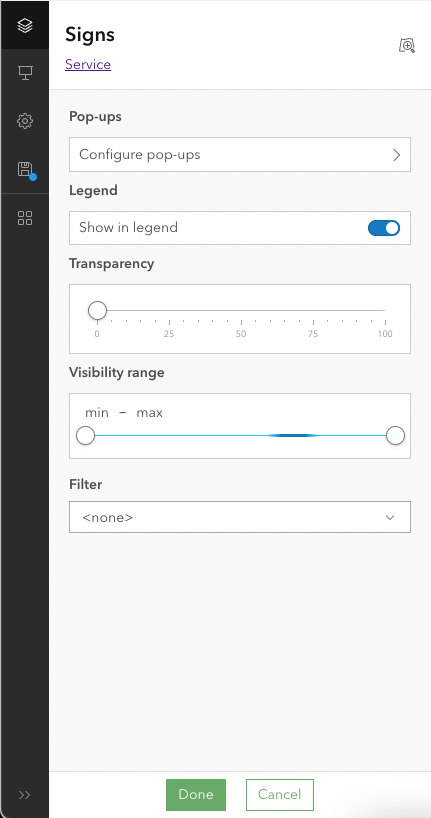
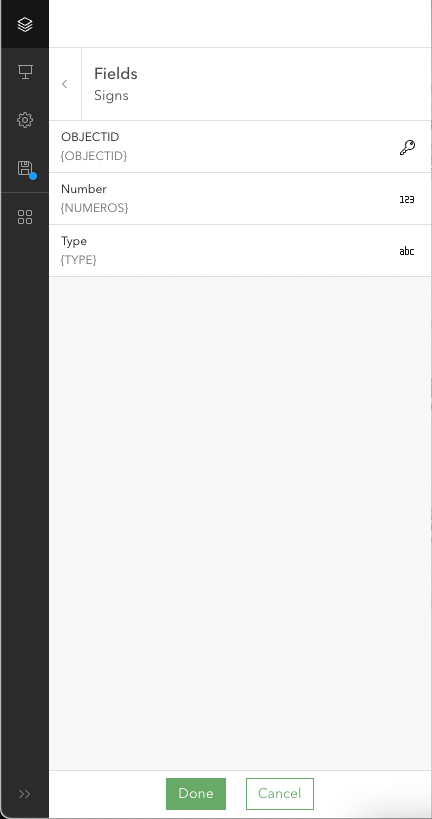
Enable pop-ups. Then, select Configure fields.
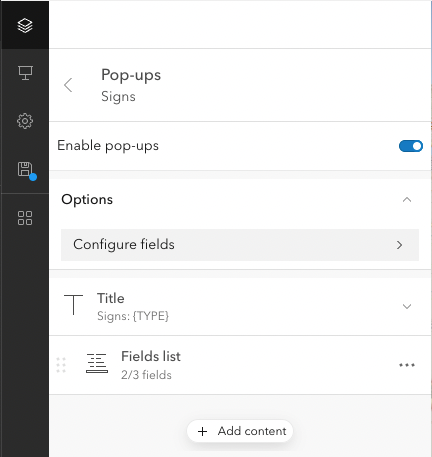
Rename NUMEROS to 'Number' and TYPE to 'Type'.
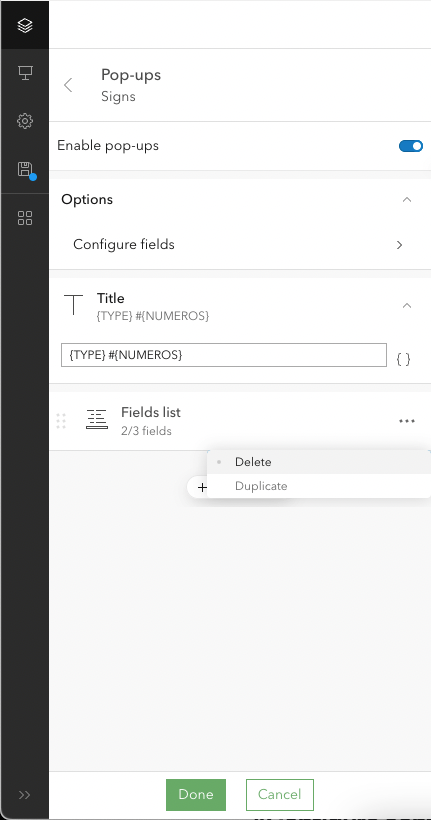
Click Done. Now click on Configure pop-ups again and under Title, enter '{TYPE} #{NUMEROS}'. Now click on the three dots next to the Fields list and choose Delete.
Click Done.
In Visibility range, define the lower limit to 10,000.
Click Done.
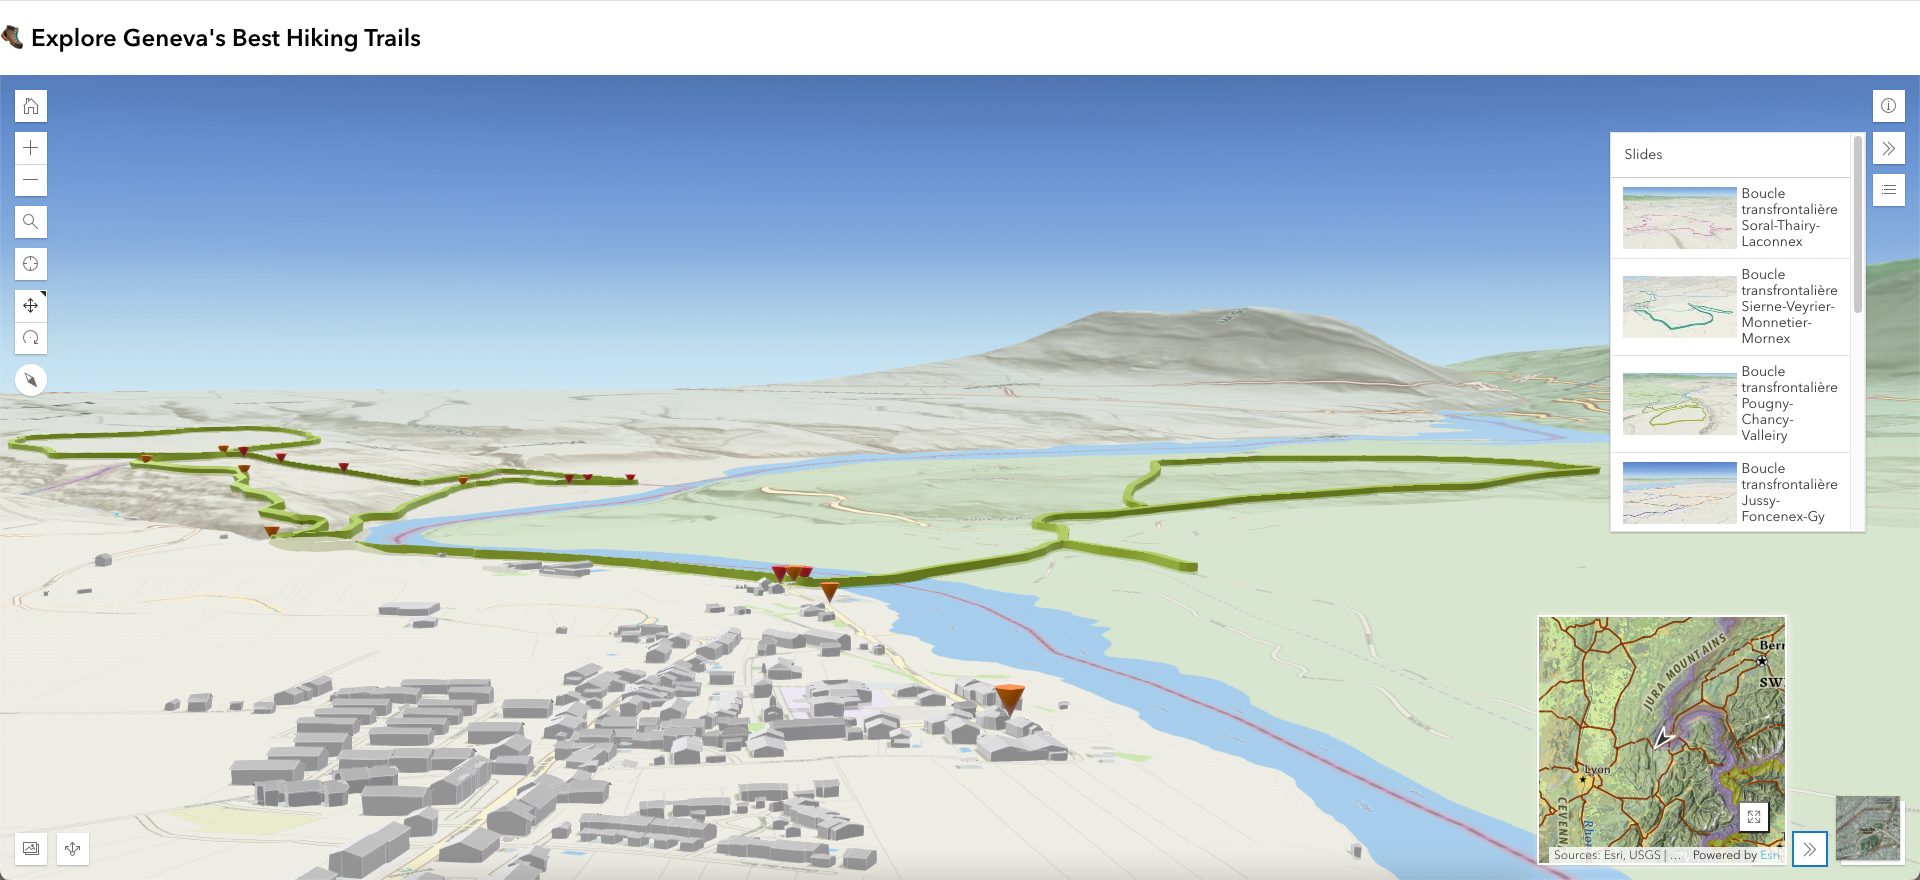
Capture slides
Slides are a sort of scene bookmark. You'll set up a scene for each trail to make it easier for users to navigate between the hiking trails.
Click on Slides on the left.
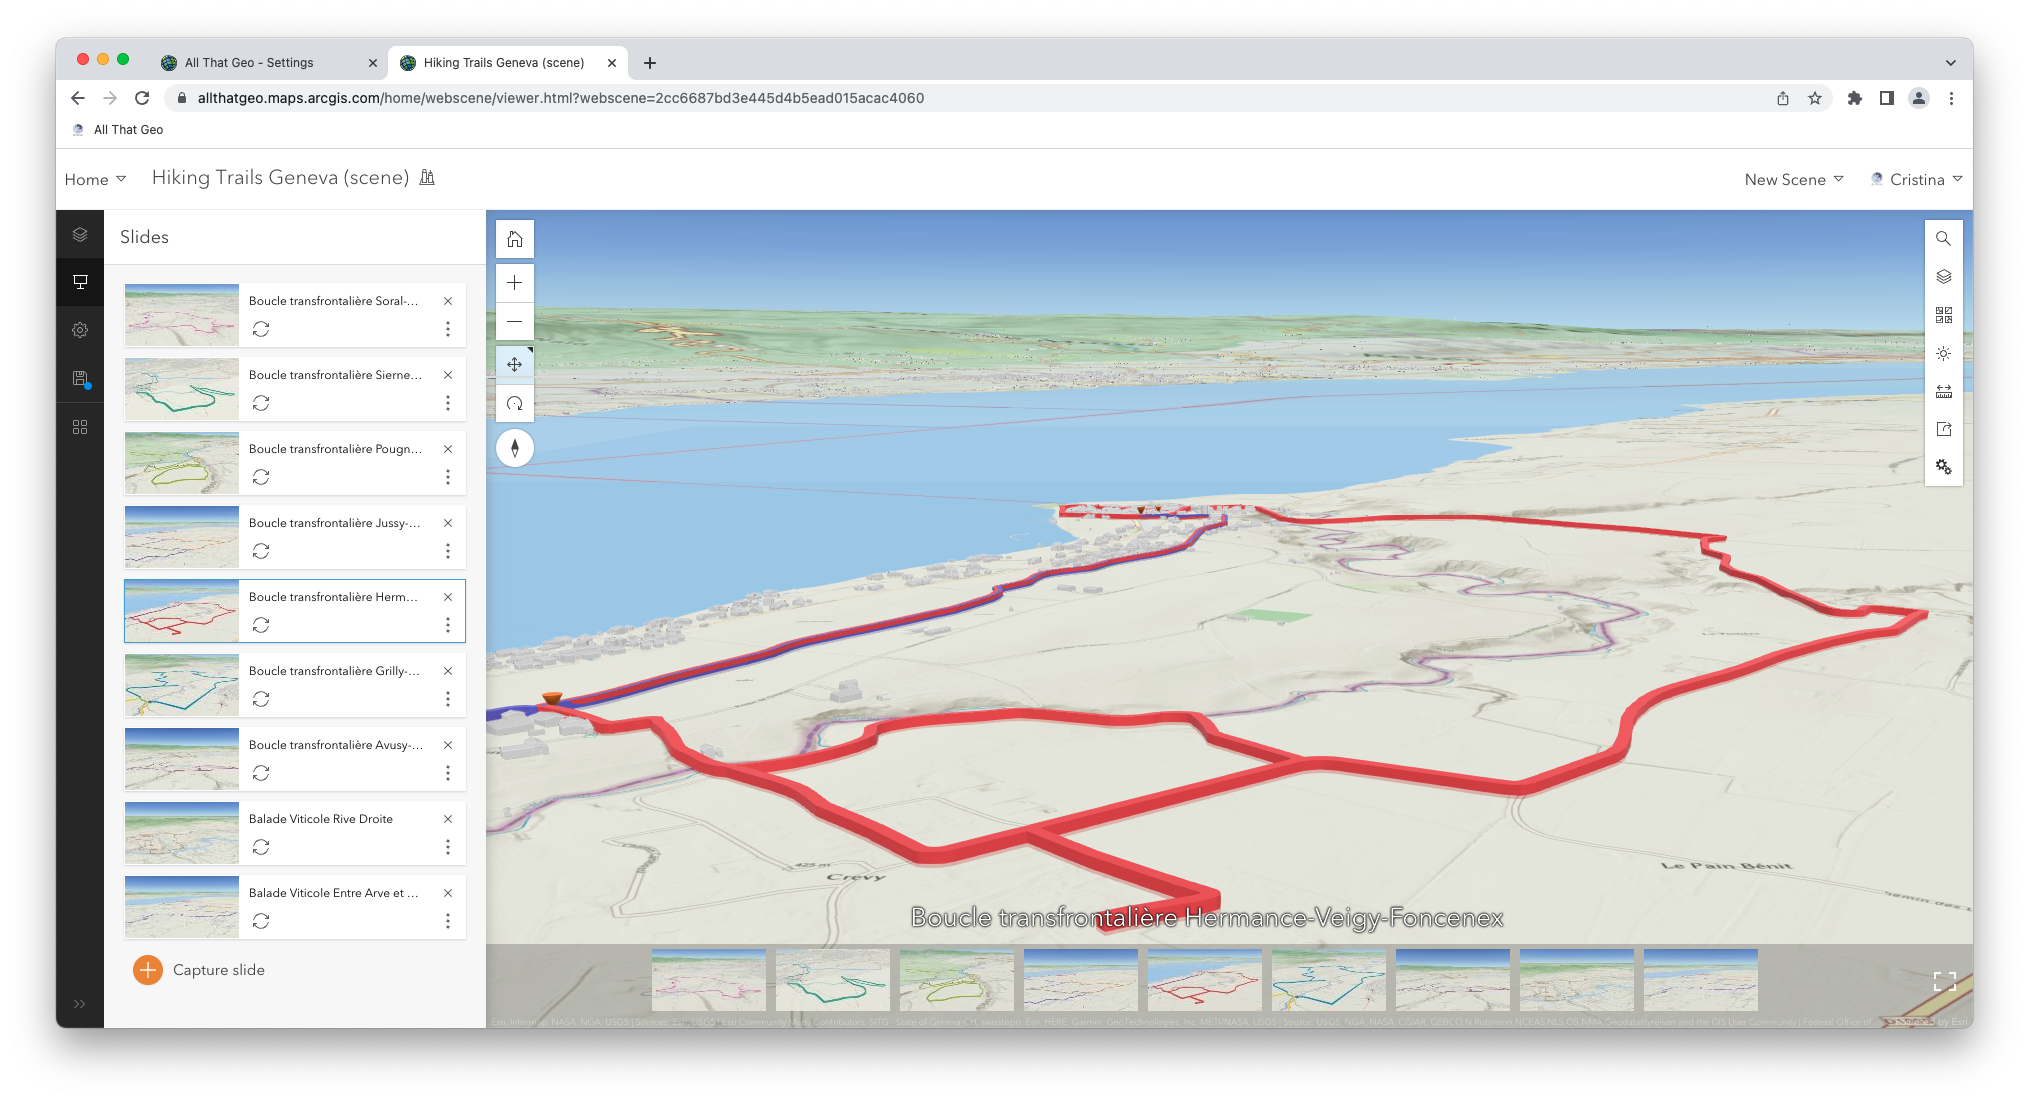
Now, zoom, pan and use the 3D navigation tools to display one trail on the map. Once you're happy with the extent, click on Capture slide on the left.
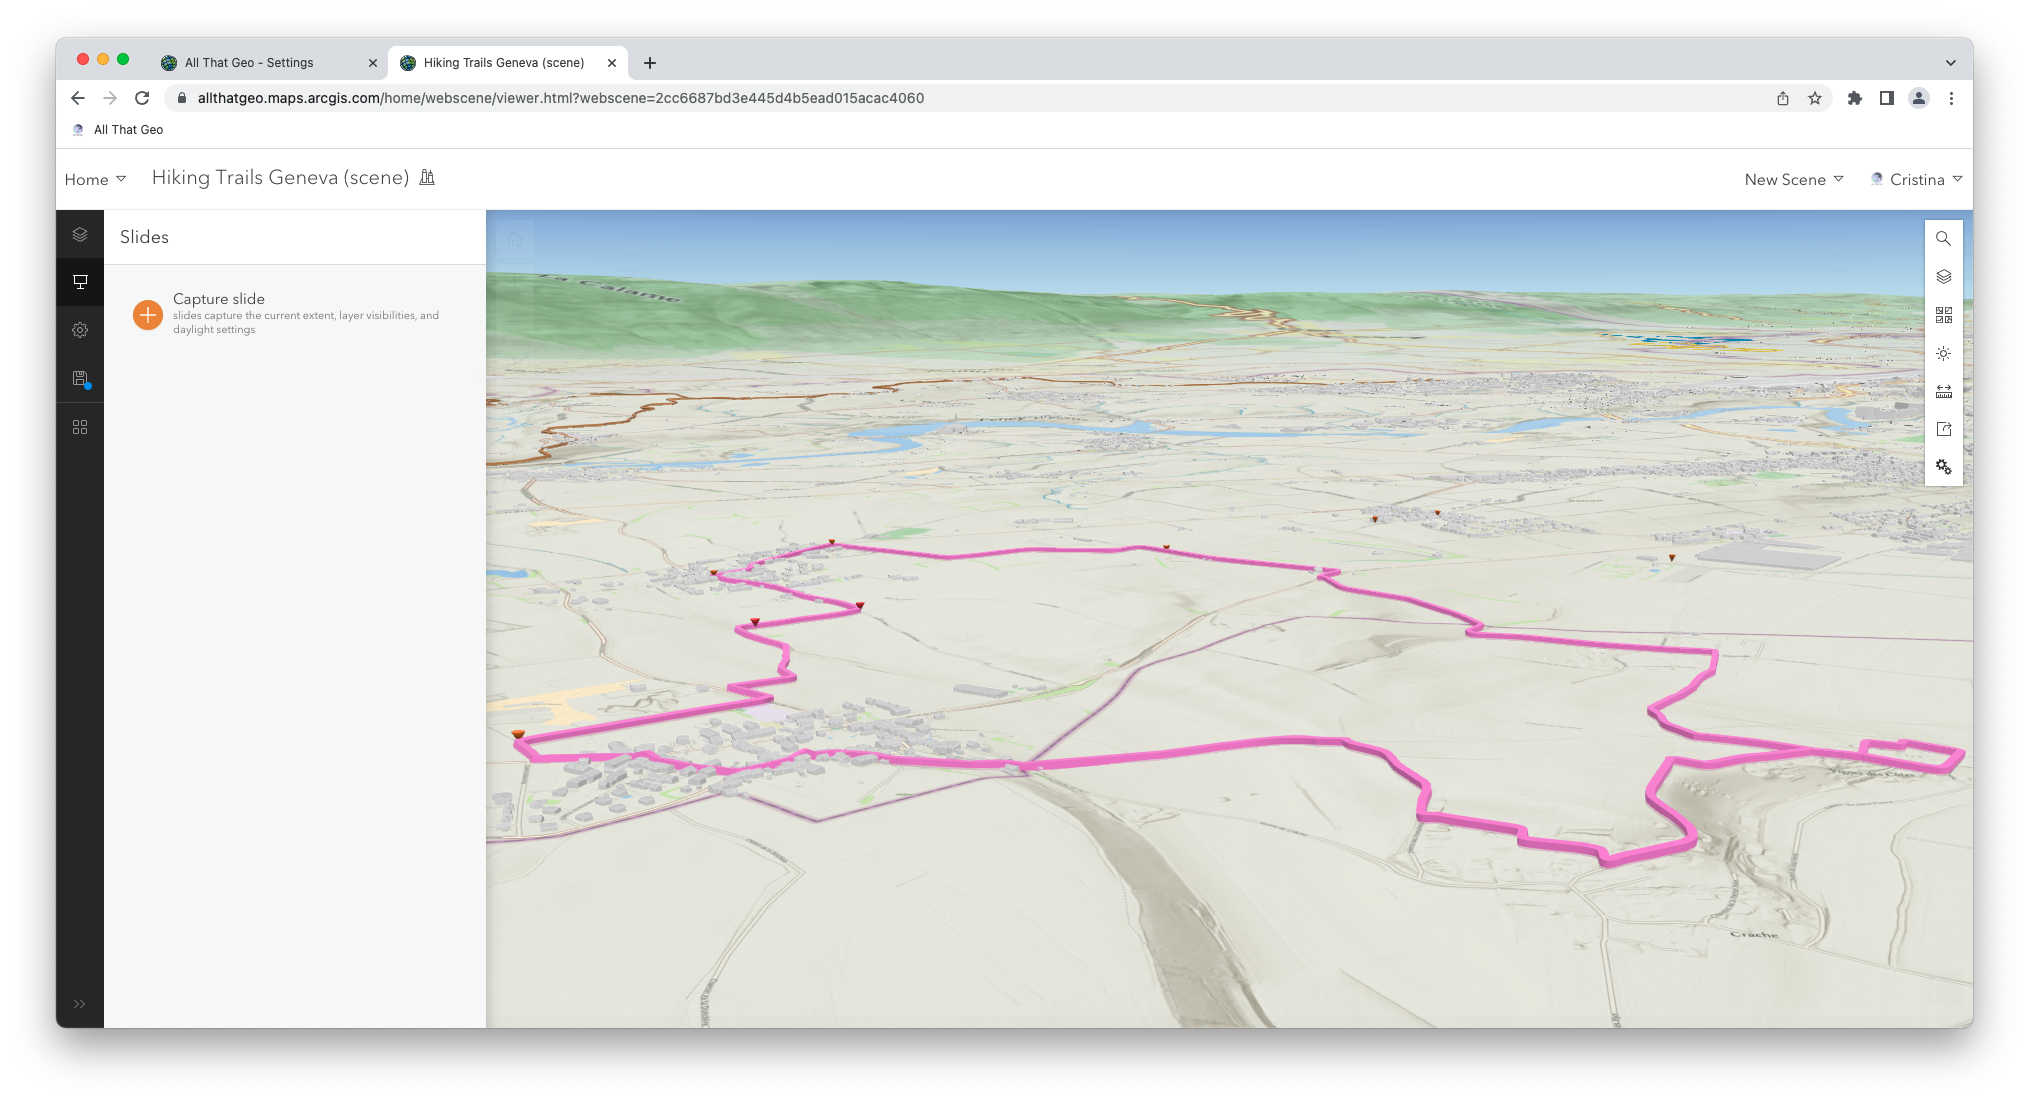
Name the slide. Click on the line and retrieve the name from the pop-up to find the trail's name.
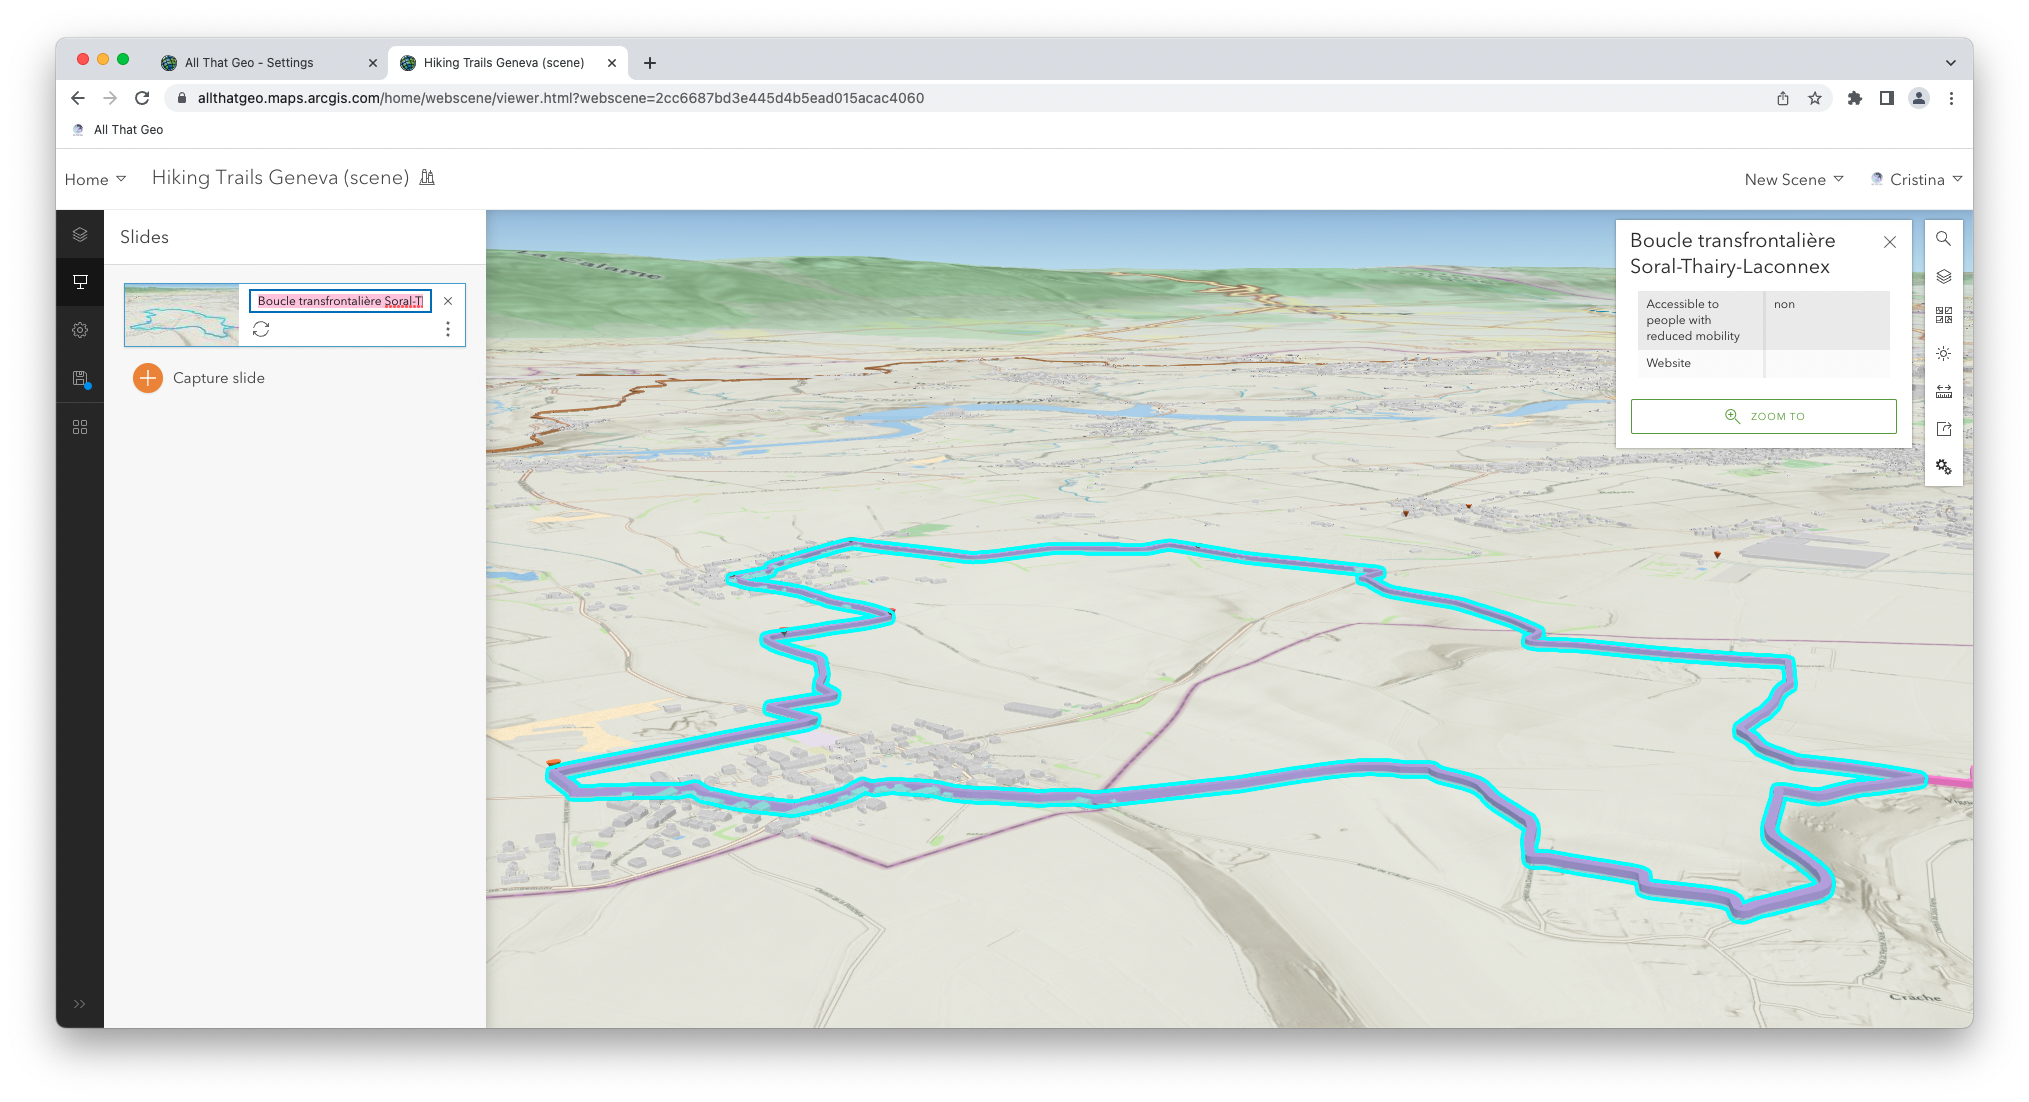
Repeat this process for all (or only the best) trails. These slides will turn your 3D app into an interactive story.
Clip to extent
Click on the cog button on the left to access the scene's Properties. Now pan, zoom, and navigate the 3D scene to show the whole area of interest (AOI).
Once you have the AOI showing on the map, enable Clip to extent on the left and click on the refresh button to Update To current view.

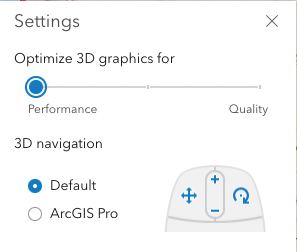
You use another trick to improve performance (at the expense of quality, though). Click on Settings on the right.
Move the selector toward Performance.
Save the scene again.
Now that the scene is set, it is time to create the 3D app! Click on the last icon on the left, Create app, and choose Instant Apps.
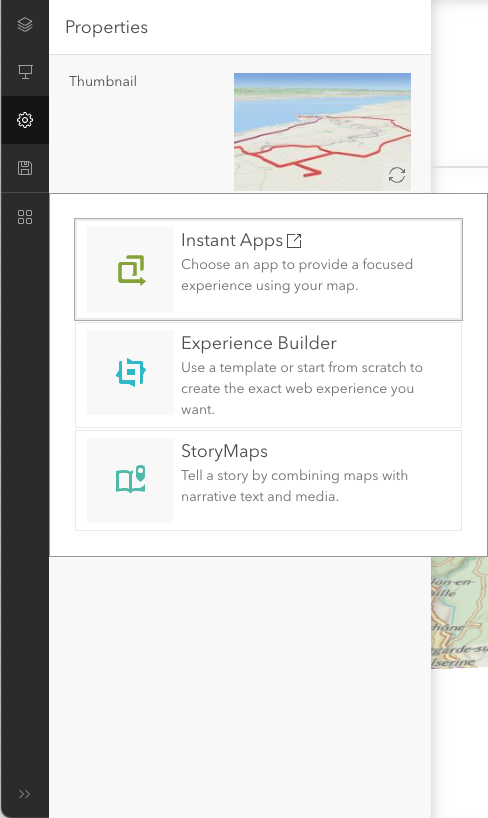
3.2 Build a 3D Viewer App
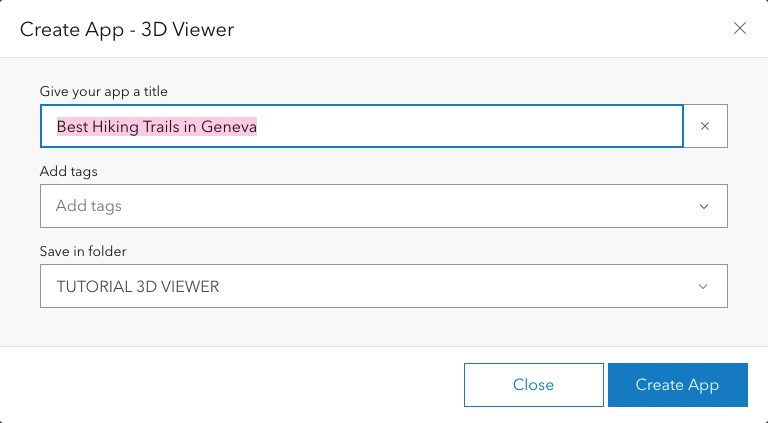
Once you're taken to the Instant Apps homepage, Choose 3D Viewer.
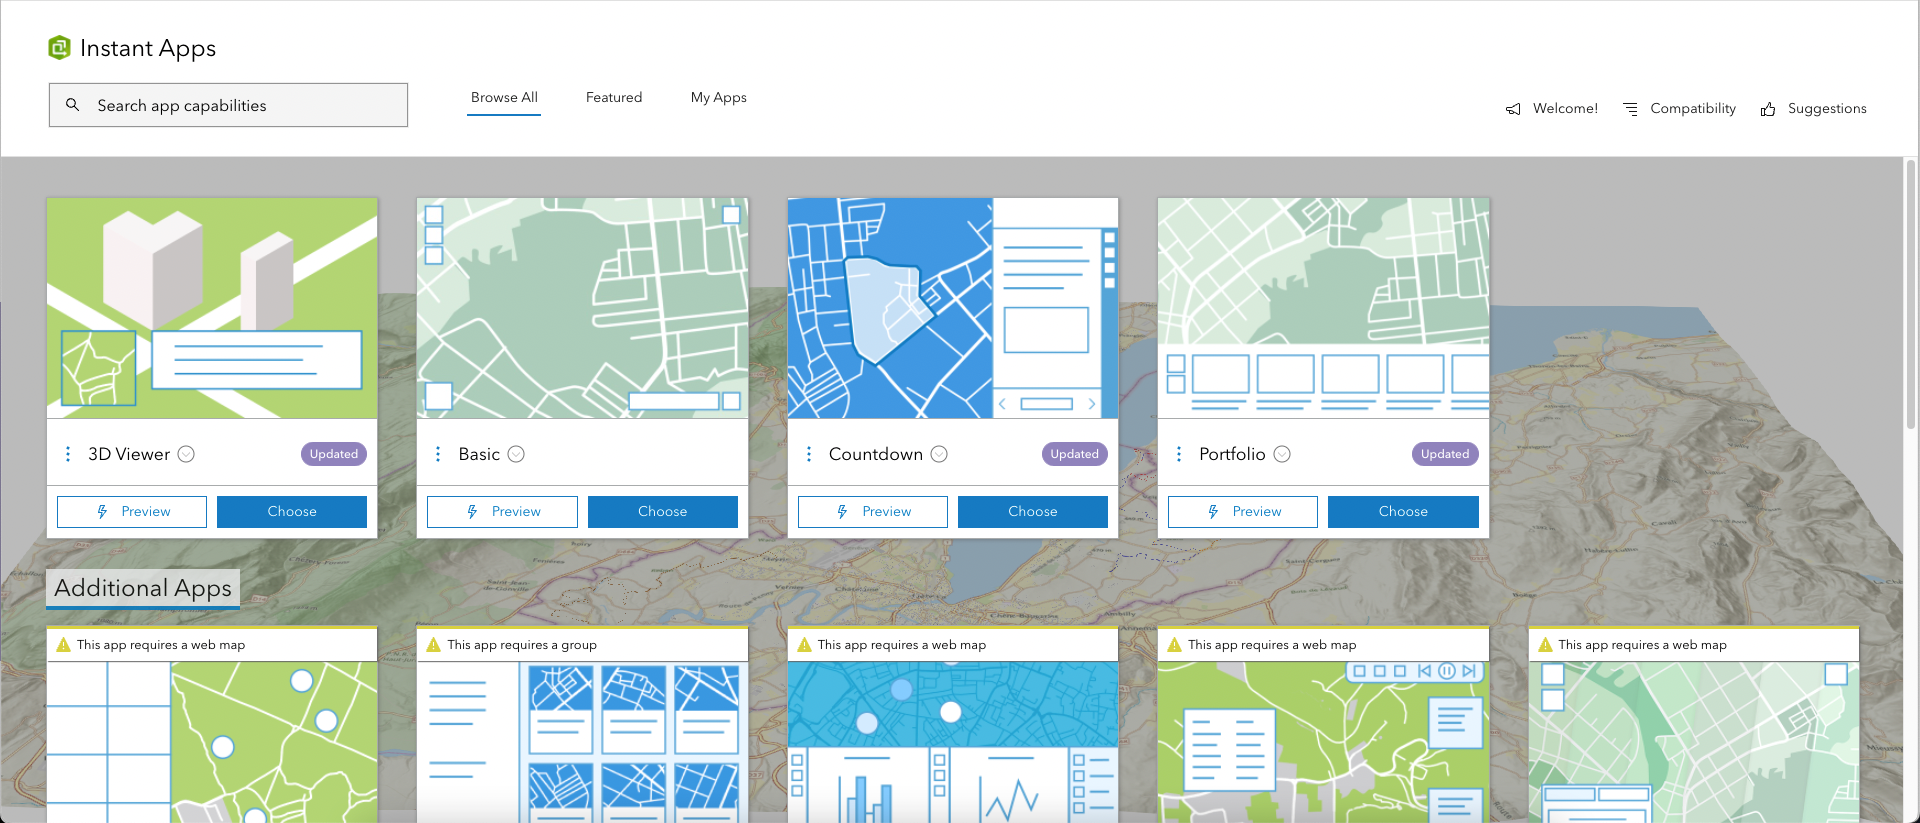
Give your app a title (e.g. 'Best Hiking Trails in Geneva') and click on Create App.
Disable the Express mode (upper left).
You're now in the Scene section (left on the screen). Given that the correct scene is already selected add a Map description under Map accessibility ('3D scene showing hiking trails in Geneva').

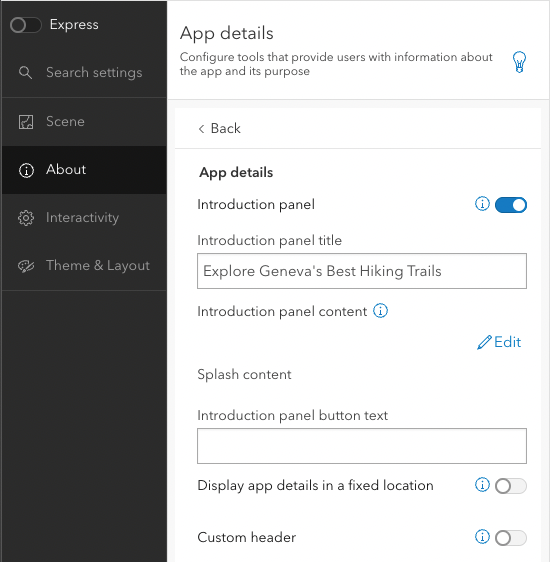
Configure app details
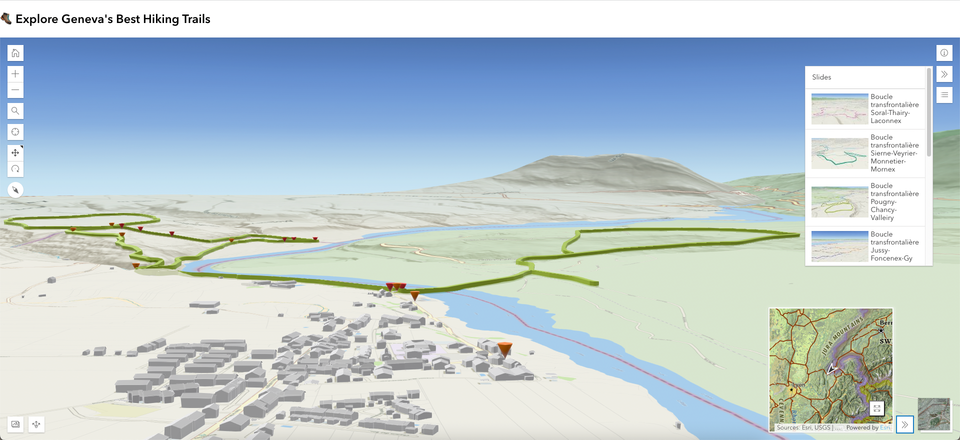
Move to the About section on the left, then choose App details. Next, enable Introduction panel and enter an Introduction panel title: 'Explore Geneva's Best Hiking Trails'.
Click on Edit under Introduction panel content and enter instructions on using the app. Here's an example:
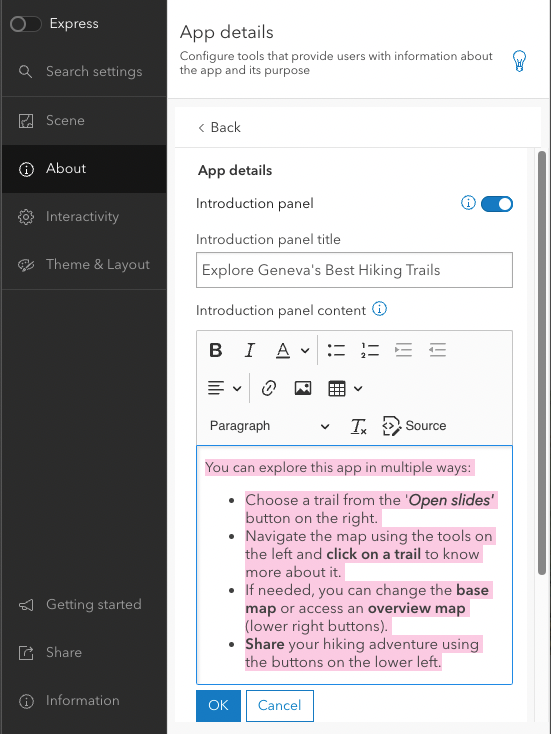
Click OK.
Move further down and enable:
- Display app details in a fixed location
- Open details window when app starts
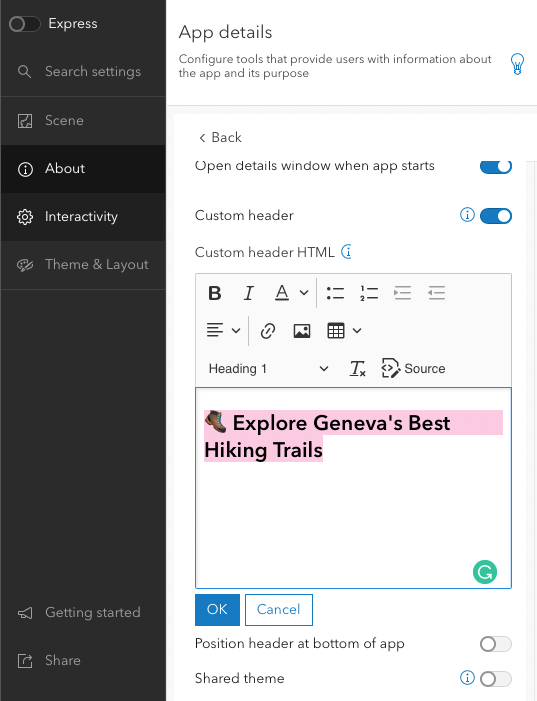
- Custom header
Click Edit (under Custom header HTML).
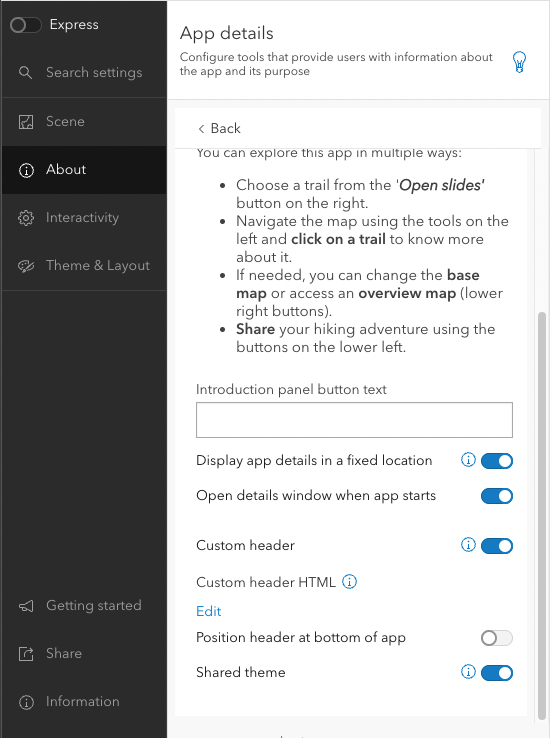
Enter 'Explore Geneva's Best Hiking Trails' and format it (note that this will be your app's heading!). Click OK.
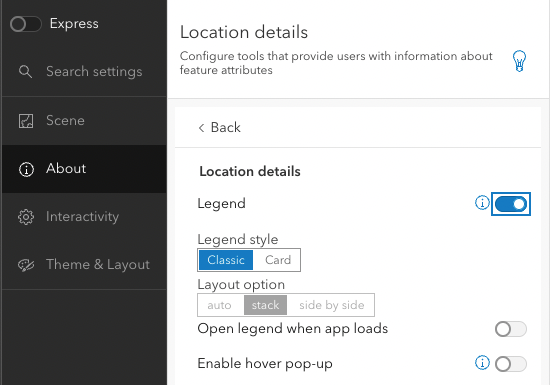
Now go Back and select Location details.
Enable Legend and select the Classic Legend style.
Configure the app's interactivity
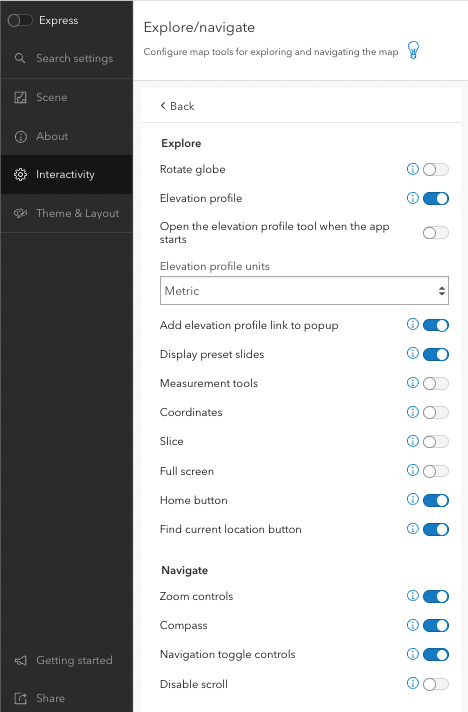
Move to the Interactivity section on the left and choose Explore/navigate.
Enable Elevation profile and change the Elevation profile units to Metric. Also, enable the following options:
- Add elevation profile link to pop-up
- Display present slides
- Home button
- Find current location button
- Zoom controls
- Compass
- Navigation toggle controls
Go Back and choose Inset map. Enable Inset map and choose the National Geographic Style Map under Select basemap.

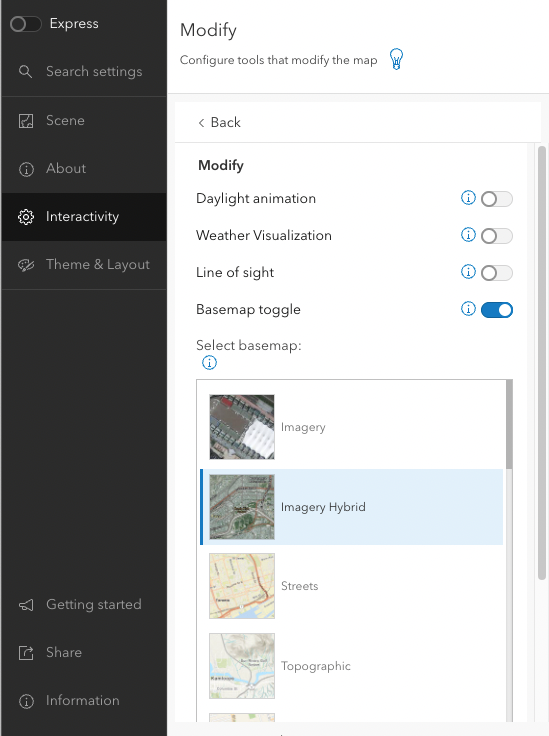
Go Back, and choose Modify. Enable Basemap toggle and choose Imagery Hybrid under Select basemap:
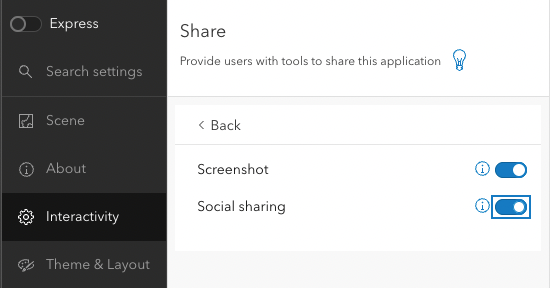
Go Back and choose Share. Enable Screenshot and Social sharing.
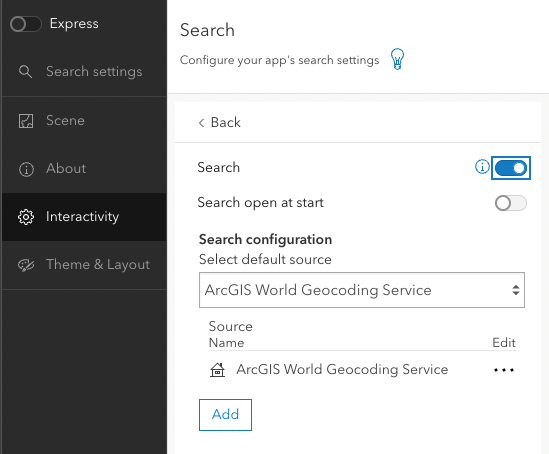
Go back and choose Search. Enable Search.
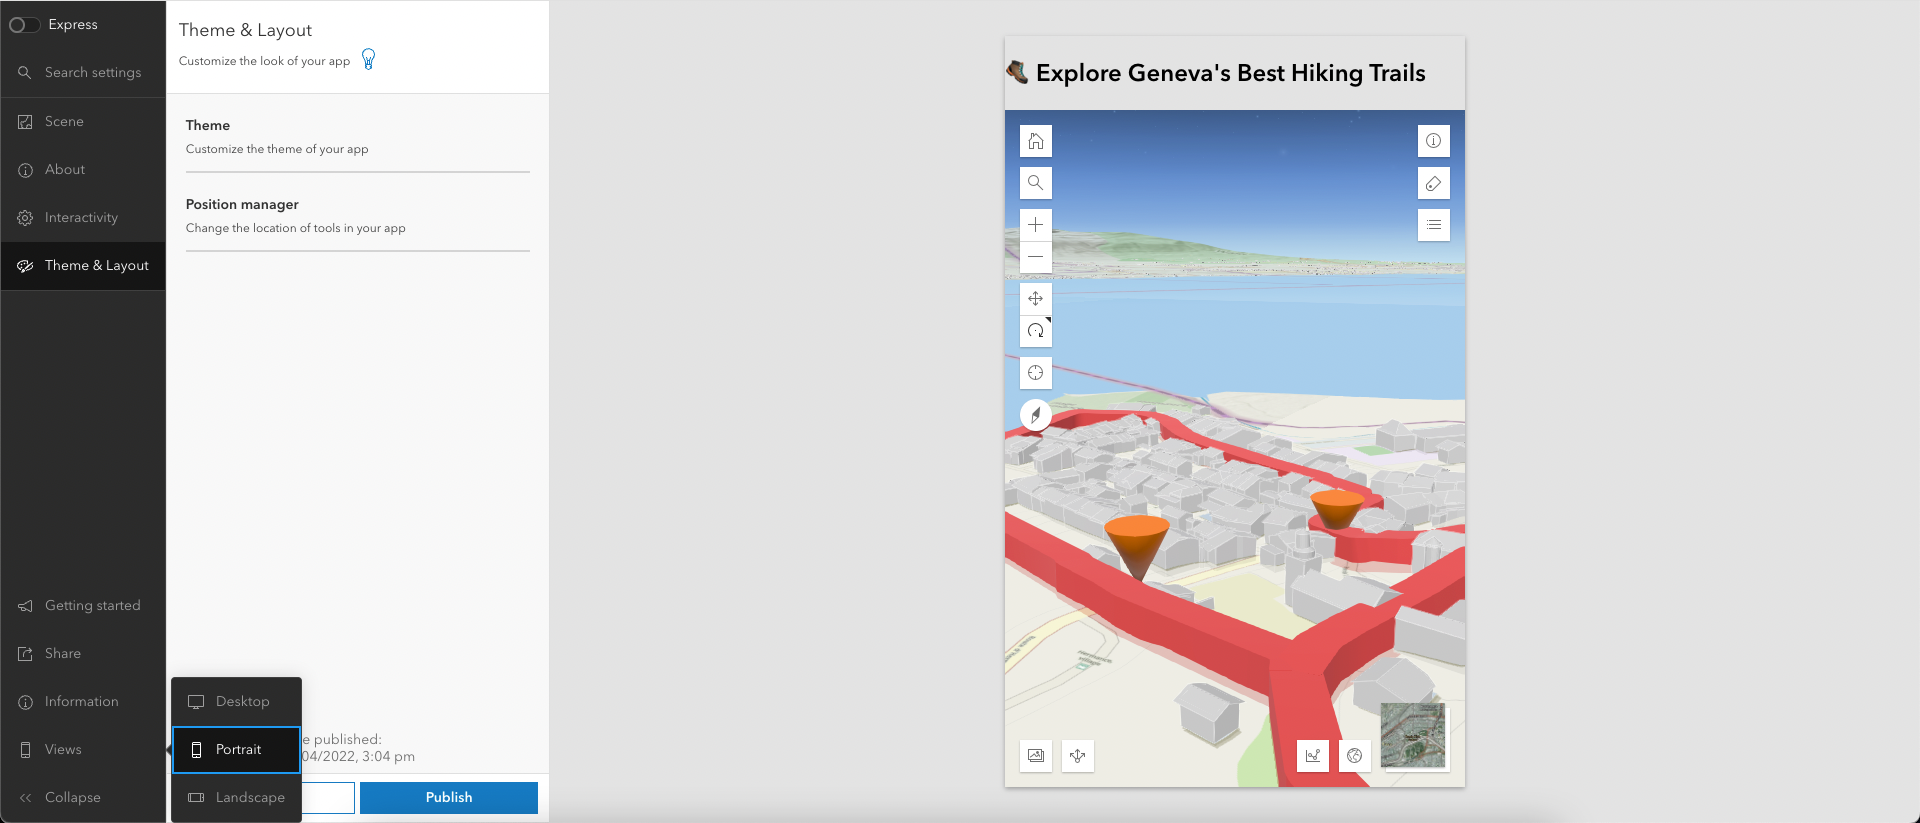
Configure the app's look and feel
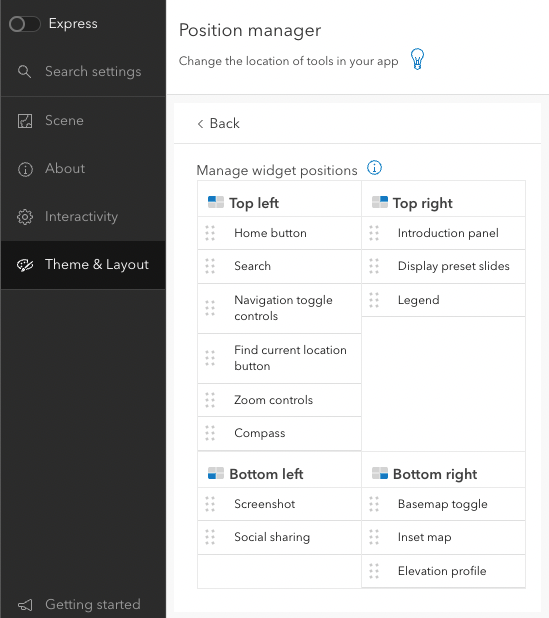
Move to the Theme & Layout section on the left and choose Position manager. Adjust the arrangement of the widgets on the app by dragging and dropping them. Here's a suggestion:
4 Share your work
Choose → Prepare → Create → Share
4.1 Publish your app
It is now time to publish your 3D hiking app and make it available for everyone!
Before you publish, though, there are still a few steps to perform. First, validate if all looks good by clicking on Views on the left - you can even test it in different screen sizes, just to be sure.
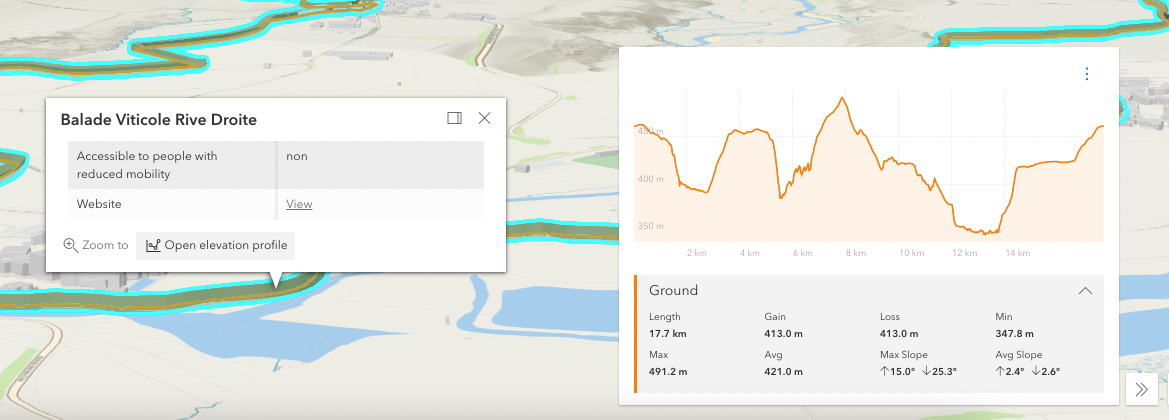
Click all widgets to test the functionalities and click on the trails to open pop-ups. I particularly like the elevation profile feature! You can access it directly from a pop-up:
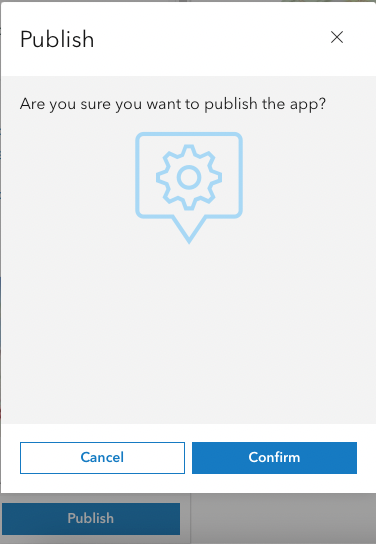
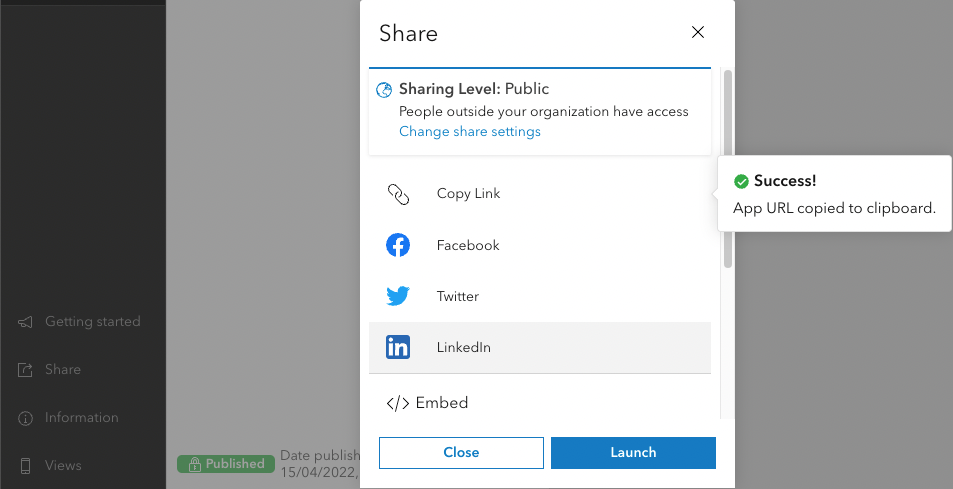
Once you make sure everything is good to go, click on Publish. Then, Confirm.
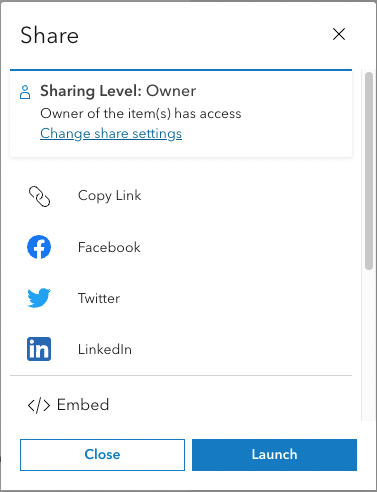
Notice that the Sharing Level is set to Owner, which means no one but you will be able to access the app. Click on Change share settings.
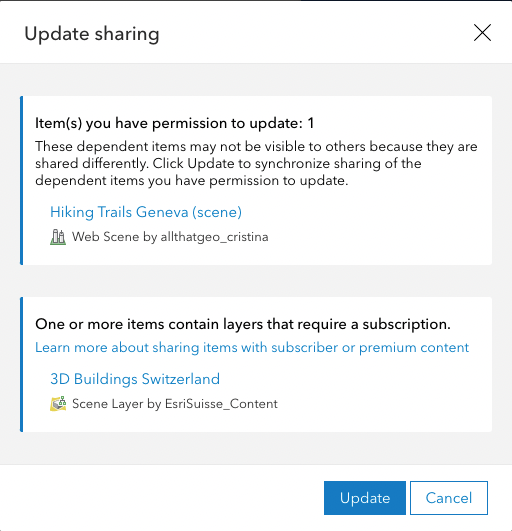
Set sharing level to Everyone (public). Hit Save.

Click Update.
The app is now published and public. Click on Copy link.
Open a new window and paste the link in incognito mode. There's your web app - now share away!
Mine looks like this: https://tinyurl.com/hikinggeneva👇
4.2 Make a short URL to customise your app even further
Can't wait to share the fantastic app you've just built with your hiking friends? You probably now need to make your URL memorable (in every way!). I wrote a post on using TinyURL here:
Cristina
🎉 Congratulations! You have just created a 3D app!
In this tutorial, you have practised:
- Getting data from the Geneva Territory Information System (SITG).
- Exploring metadata and accessing web services.
- Creating a web scene with ArcGIS Scene Viewer (including setting up a local scene, choosing a basemap, adding layers, capturing slides and clipping to an extent).
- Building a 3D Viewer App (including using the web scene you created earlier and configuring the app's details, interactivity, look and feel).
- Publishing your 3D hiking app.
- Making a short URL to customise your app even further.

The Monthly with All That Geo
Want to learn how to use ArcGIS Online for spatial, data-driven storytelling? Sign up for The Monthly with All That Geo and I'll deliver a new example of an interactive web app straight to your inbox every month.
You'll get a behind-the-scenes look at how it was built—from the data collection process through the final app—so you can practice your own data visualisation skills and unlock your creativity as you go.
If you want to find inspiration to start a project that will make a difference in your study area or work, sign up for The Monthly with All That Geo!


Member discussion